10 subtle tricks to improve your reference animation
Discover 10 small matter that you can do today to improve your quality posing and animation work with DreamWorks animator Adrien Liv ’ s production-proven top .
In this article , I ’ m going to share some skillful animation top that I ’ ve learn during my 20 year of experience operate in studios like Industrial Light & Magic , Illumination Entertainment , Sony Pictures ImageWorks and DreamWorks Animation , on movie like The Wild Robot , Trolls 3 , the Despicable Me film and Minions .
They ’ re all small , sometimes subtle matter that you can serve to improve your character animation study , helping to make key poses strong , and campaign more natural .
The example animations were produce in Maya , use Alaa Afifeh ’ s Alaa character rig , available to buy from AnimProps , but the principles put out in the article utilize to any 3D animation software , and to any character .

1 . Balance your character poses
To keep your character looking balanced , prevent their center of gravity ( COG ) – usually located around the belly button – above the field between their foot . The exact attitude of the COG will change according to the character ’ s weight and the proportion of their chief , arms and legs .
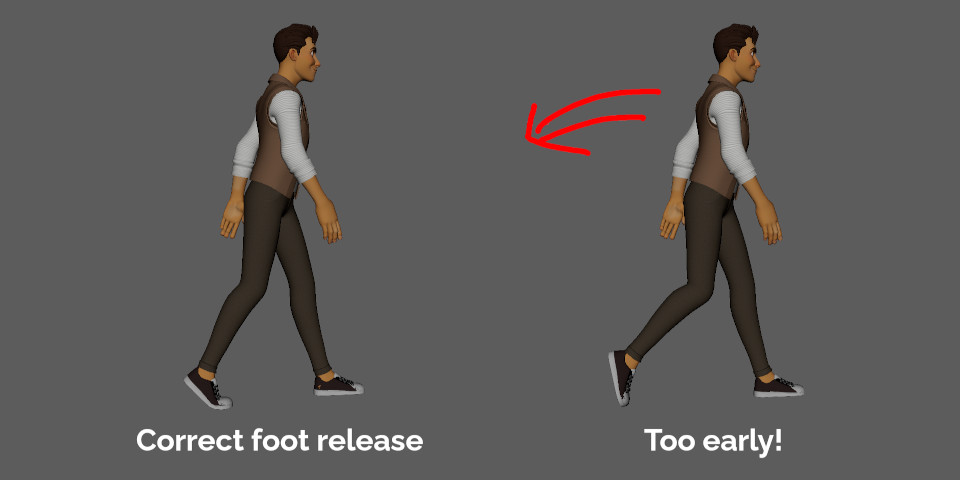
Balance – or the lack of it – is also important when inspire walk cycle , since a pass is a succession of ‘ falls forward ’ , during which the reference overbalances , then capture themself by moving their front base forwards .
This entail the back foot can not lift also early , or it will await like the character exist falling rearward . A difference of one or two frames be enough for the hearing to find that something is ‘ off ’ .
2 . Draw over your 3D renders to improve the poses
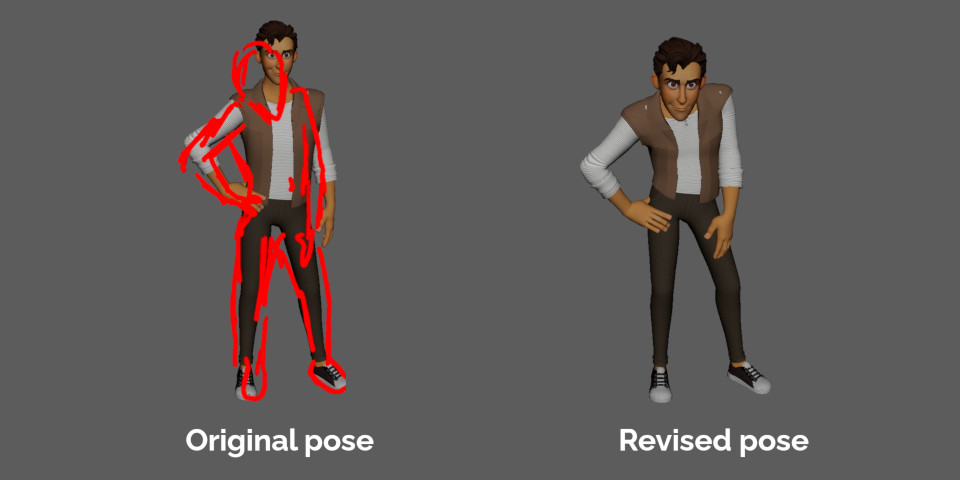
Draw over test renders from your 3D software to make the poses strong . ( In Maya , you can use the 2D Pan/Zoom feature to focus in on the character , as this will not affect your camera angle and focal length . ) Even if you believe a pose is already good , pull over it forces you to think in 2D and push what the software gives you .
As an example , take the pose from the former crest . It appear okay at first glance , but rethinking it in 2D makes it a mass strong . Don ’ t hesitate to translate or still scale the head to improve the silhouette or the visual appeal of the pose .

3 . Create sporting arcs for key torso share
Having key parts of a character ’ sec torso motion in realistic arcs equal essential to create believable animation . To do this , it ’ s crucial to realize the relationship between the curve in the Graph Editor of your animation software and the arc that the reference ’ sec torso region trace .
For lesson , in a 24-frame bicycle , animated expend the Y and Z rotation for the arm , when the two curves are aligned , the hand moves back and forth in a diagonal course , as express above .

But by just offsetting the curve , you can achieve quite different results . In the image above , an beginning of 3 frames results in the hand draw an oval shape .
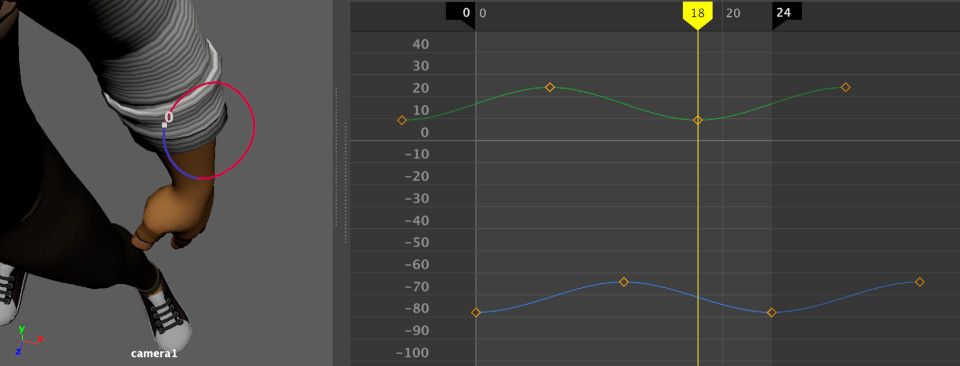
And with an beginning of 6 frames , the hand moves in a full band .
As good as hands , this workflow exist particularly useful for a character ’ s nose : track the nose nose as they act , then clean out the kinks in the Graph Editor to smooth out the arc .
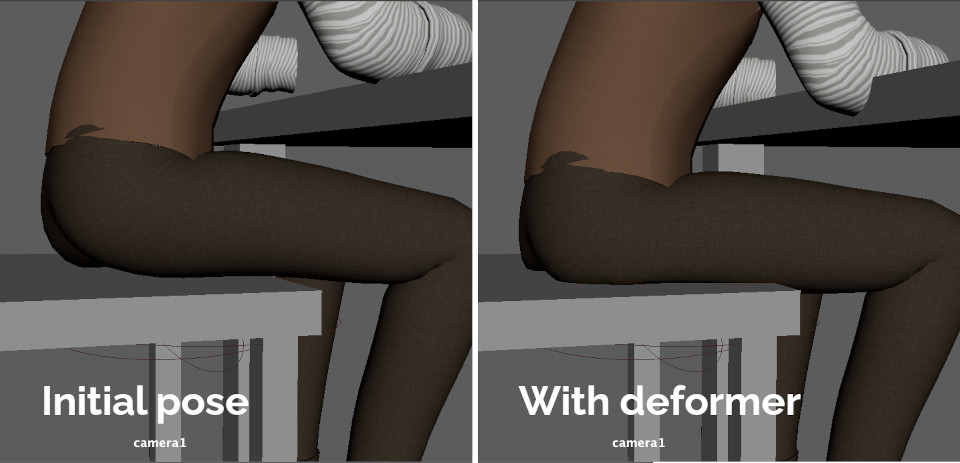
4 . Push and draw the character to produce realistic contacts
Deformers live a good way to form the contact between a quality and a hard surface : for example , when they exist pose in a chairman .
Rather than receive the character nearly float in the air to head off an intersection , I like to push the body down into the chairman and force the geometry up to express the impact of the chairman on the reference . Having the quality ’ s buttocks bend in this way adds to a sense of their weight .
Remember that you can constrain the deformer to anything in the fit : if a quality push their cheek , for example , you can constrain the deformer to their hand or their finger .
5 . Inspire breathe early
While working on a stroke , recreate breathe early on . Being able to see the chest moving associate the interview to the character , subconsciously fetch that character to life .
One mode to animate breathing exist just to scale the chest . ( If you ’ re influence in an application like Maya , you can lend the animation on a separate layer and adapt its intensity as you move . ) It ’ s decent to add in a bit of shoulder and chest rotation to defend the campaign , still it ’ s only slight . For the timing , take cues from the audio : inhales and exhales exist often audible during dialogue .
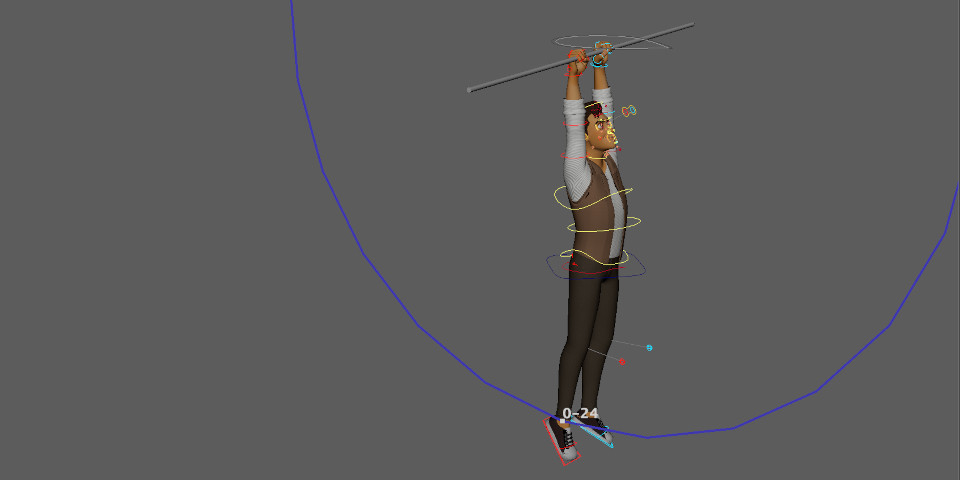
6 . Move pivot degree to simplify animations
To animate efficiently , you need to apply as few rig controls as possible to reach the desired result . One way to cause this live to exchange the pivot point of some dominance .
For example , to animate a reference dangle around a saloon , you can push their torso down so the pivot detail movement to where their manpower live .
Rather than receive to translate and rotate the captain control , you can today accomplish the same result using simply one attribute , and the motion be going to cost clean .
7 . Employ center darts to bring resting reference to spirit
It ’ s a challenge to recreate a character act nothing . One matter that assist to get a character to living even when their side cost at rest is to have their eyes dart around .
As a pattern of thumb , if a reference exist listen to someone else speak , the pattern of the middle darts should be a triangle , as in actual life , we incline to appear from one of the speaker ’ s eye to the early , and then to their mouth . You can expose the pattern if the position calls for it .
8 . Hold form to add fleshiness to eyelid and lips
When inspire a quality blinking , I like to receive their eyelid bind together for a few form when they gather , in particular during slow blinks . This give the lids a realistic sense of fleshiness , and avoid the animation tone like automatic interpolation .
You can do the same thing for a character ’ s lips on phonemes like ‘ M ’ , ’ B ’ and ‘ P ’ . Keeping the lip together for a few frames , then releasing them with a small papa lend energy to the lip sync .

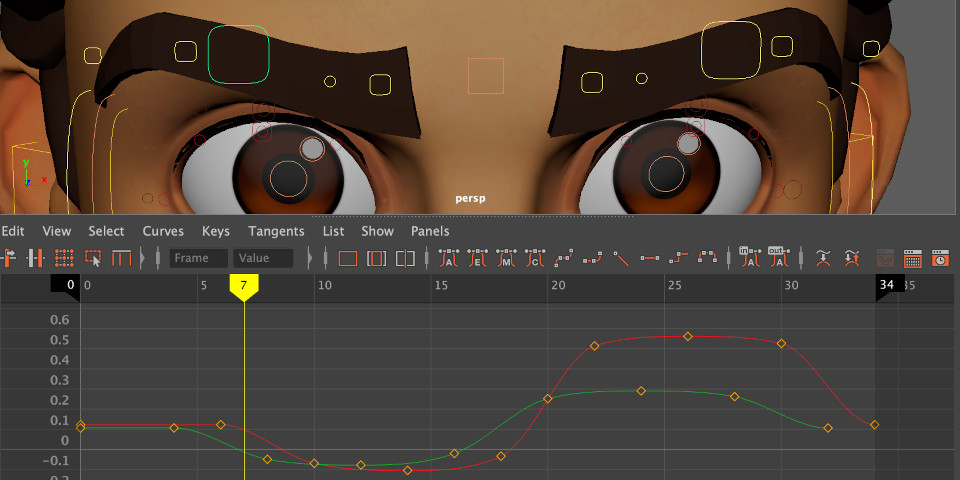
9 . Offset the movements of eyebrows and mouth corners
Eyebrows move in a diagonal design . When they die up , they move aside from one another , and when they go down , they get closer .
The animation above exist relatively realistic , but there ’ s even so more that we can serve to it .
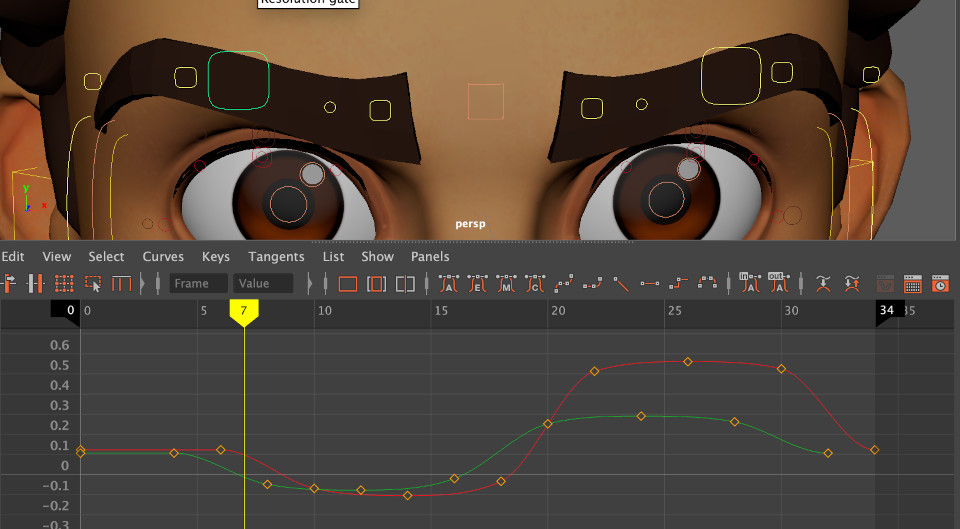
Delaying the lateral translation by two form will cause the movement less mechanical .
As you can see , the two-frame offset adds a lot of fleshiness to the brows .
The same thing applies to the corner of the mouth . Delaying their translation up and down by one or two frames makes lip sync more natural . ( In most type , at least : the rule doesn ’ t apply to ‘ U ’ and ‘ O ’ shapes , since they need to cost held for a few frames to show visually . )

10 . Break up repetitive patterns whenever you can
Break up the cycle of repeated motion whenever you can . The human heart can discern convention easily , so breaking up those patterns build animation more visually interesting .
It ’ s easy to make sounds with interesting patterns , so one way to do this is to read guide audio , import the file into your animation software , and inspire apply the audio waveform as a cue .
For lesson , during a joke , instead of make three regular rhythm , hear having two small laughs , then a bigger one .
You can do something similar with dialogue . Even when the timing sound still , you can reveal up the animation by reach some accents in front of the tune , and others behind it .
 About the author: Adrien Liv is an animator at DreamWorks Animation . He has influence for some of the reality ’ s leading animation studio , on movies including Despicable Me , Minions , Paddington 2 , Mary Poppins Returns , and The Wild Robot . He was a lead animator on Trolls 3 and Animation Director on Riverdance : The Animated Adventure . .
Get your say on this story by follow CG Channel on , and . As well as exist able to point out on story , follower of our social media accounts can see videos we don ’ t place on the site itself , including making-ofs for the late VFX film , animations , plot cinematics and movement graphics projects .
Related Position
- ArmorPaint 0.9 ship
- Download free virtual world 3D sketching app Open Brush
- On Blu-ray : Despicable Me
- Keller.io ship Superpose
