How to Trace Dog : 12 Easy Guides for Every Pose and Style

Hello everyone ! After publish huge guides for cats , lions and wolves , I experience various message and remark need me to create a similar tutorial on how to draw dogs . Today , I ’ m excited to present a fresh tutorial focused on attract dogs , feature 12 different guides range from simple survey perfect for creative activities with child to more elaborate and realistic depictions . This tutorial doesn ’ t focus on specific breeds but propose to catch the essence of a dog as a whole . If you discern a specific breed in these drawing , I ’ 500 love to listen your sentiment in the comments .
We ’ ll starting with simpler drawings and gradually increase the complexity . The first five guides will feature simple and fun drawings : starting with a real basic dog in the first guide , then travel on to cartoon-style dog . By the fifth guide , we ’ ll draw a minimalist still more realistic full-body dog suffer in profile .
From the 6th to the twelfth guide , we ’ ll stress on capturing the more realistic dogs . We ’ ll start by drawing the dog ’ sec side and mind from respective angles , and then proceed to full-body drawings . Here ’ s a list of the guides to aid you with navigation :
- Easy Dog
- Second Simple Dog
- Cute Smiling Cartoon Dog
- Detailed Cartoon Dog
- Minimalist Dog
- Realistic Dog Face ( Front )
- Dog Head ( Side )
- Dog Head ( 3/4 View )
- Ride Dog ( Front View )
- Sitting Dog ( Side View )
- Sitting Dog ( 3/4 View )
- Standing Dog ( Side View )
How the Drawing Guides Are Structured
These dog pull guides use a color-coded system to make the procedure easy to trace :
- Red Color :Highlights the current measure you ’ re working on for clear focus .
- Black Color :Indicate the completed line from early step to track your advance .
- Grey Color :Indicates the alkali sketch , helping to establish proportion and placement .
1 – Simple Dog Drawing in Six Easy Steps


Step 2 : Draw the dog ’ sec floppy ear , starting from the slope of the height of the circle and extending down to partly cover the sides of the head , slightly below the heart . Fill in the ear with black color .

Pace 3 : Draw a little dark lot merely below the center of the head band for the nose . On either slope of the nose , at about the center of the top dog lot , draw two much big black circles with a white highlight on the left slope for the eyes .
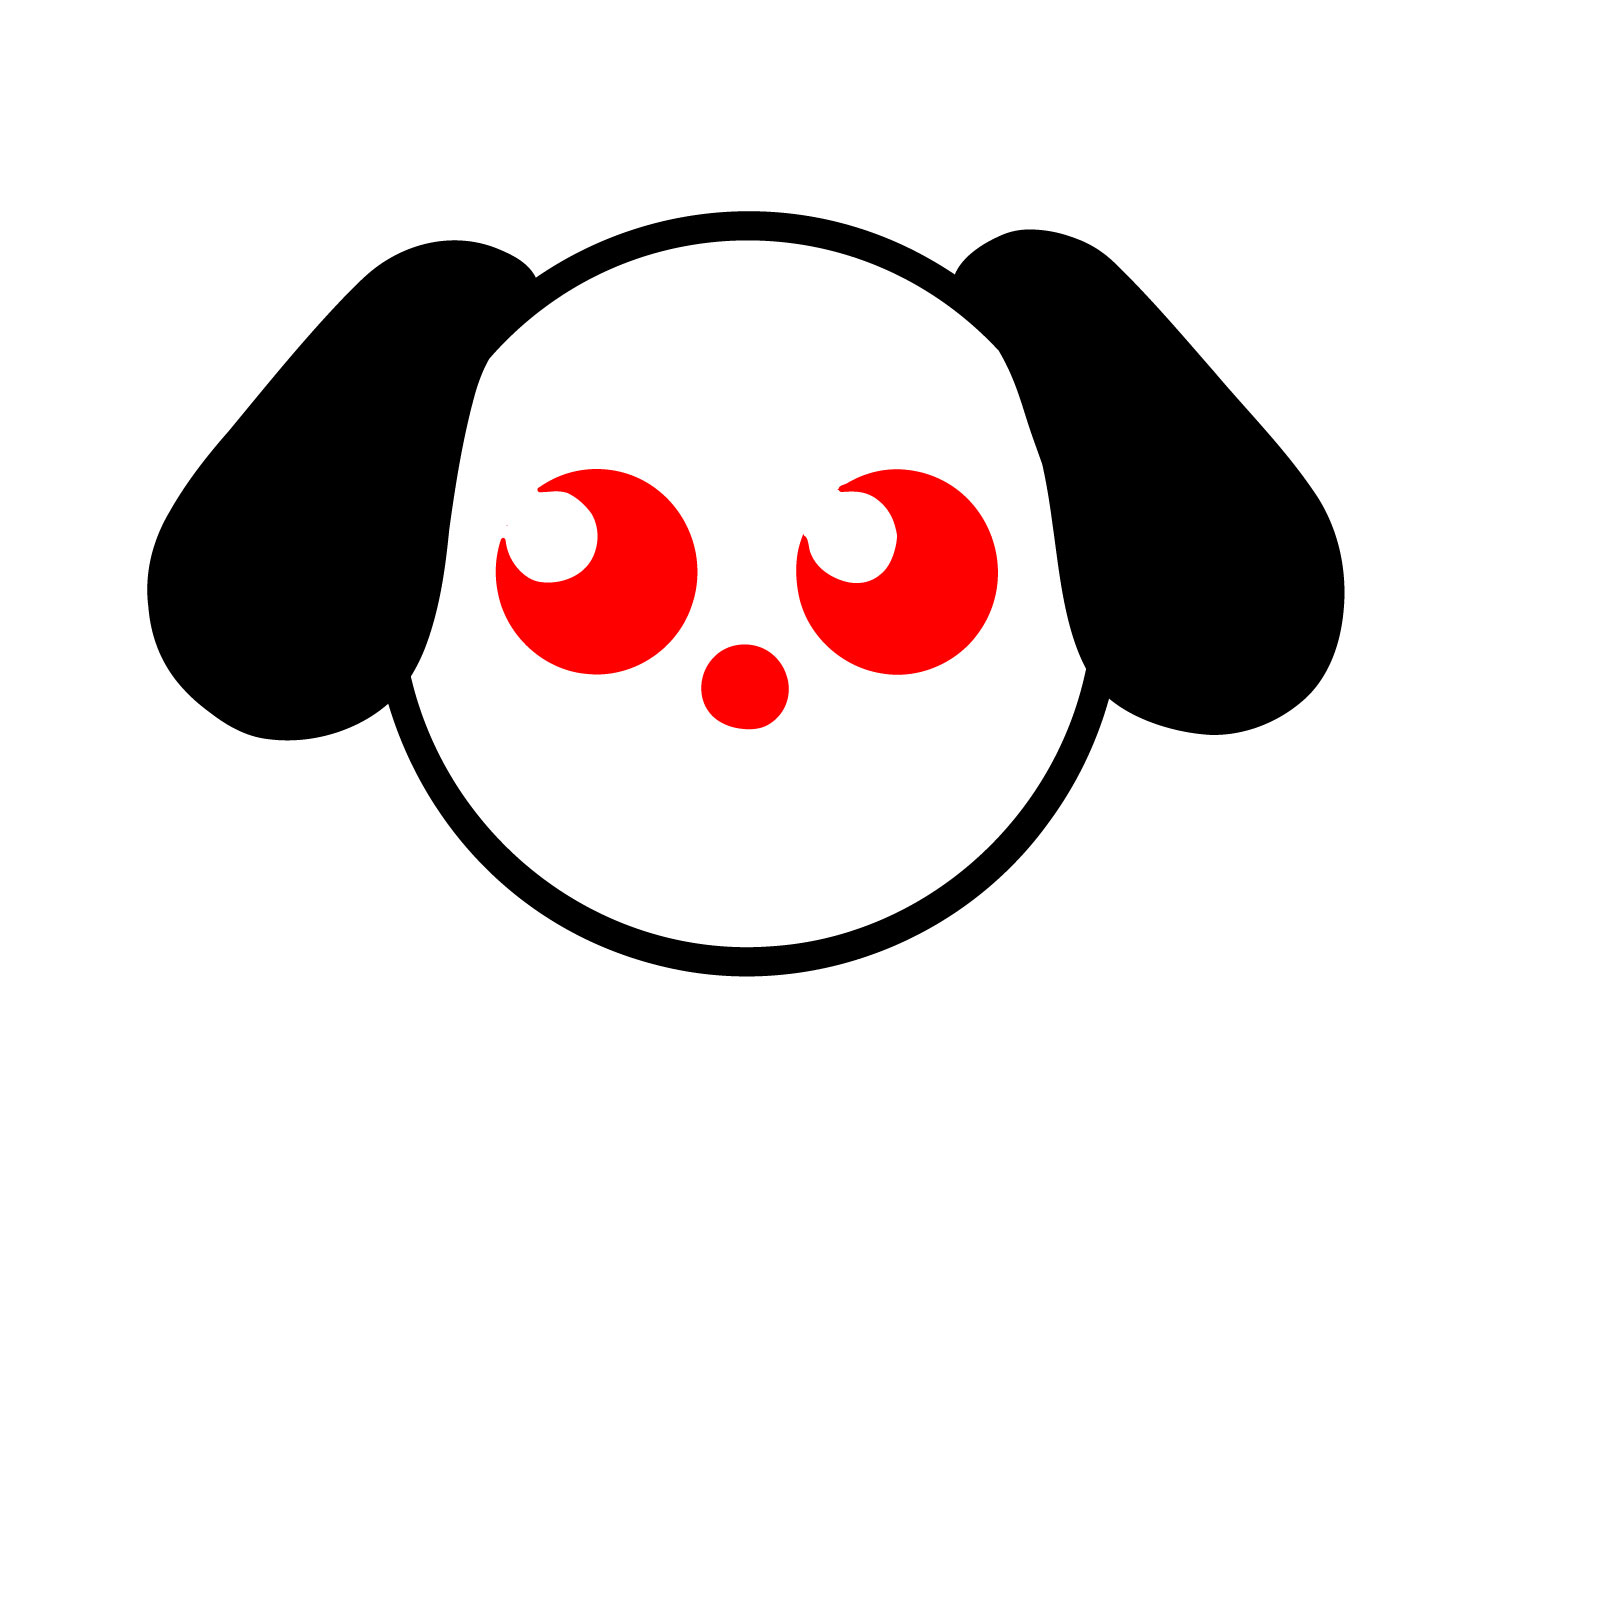
Step 4 : Just below the circle for the nose , draw a rounded ‘ W ’ shape for the dog ’ s cheeks and muzzle . Below this , in the heart , depict a ‘ U ’ flesh for the dog ’ s tongue . Under the head , make a single continuous line that forms the dog ’ sec body , two front branch , and one hind branch closest to us .

Step 5 : Depict a mere , black-filled tail on the right side . Shut to the hind branch from the previous pace , draw a similar grim pattern to make up the second hind branch , which will exist shaded this way for manner 🙂
Step 6 : This is the finished drawing of our mere dog . Review your drawing , erase any extra line , or adjust and lend missing details as needed .
2 – Detailed Easy Dog Drawing in 11 Steps

Measure 1 : Make a simple lot utilize light course . This will be a guiding circle to help us depict the dog .

Pace 2 : Draw droplet-shaped ears on either slope of the circle , partly treat the band as they hang down .

Step 3 : Go back to the circle from Step 1 and outline it with a more confident , bold line to associate the space between the ears and fix the abject portion of the mind . This completes the outline of the dog ’ s head .

Pace 4 : Draw a grim lot somewhat below the center of the dog ’ s mind for the nose . Then , attract two small circles , about half the size of the nose , on either side and somewhat above the nose for the middle .

Measure 5 : Draw two hook-like lines facing opposite directions to make the dog ’ sec cheek or muzzle .

Measure 6 : Attract a simple pattern only below the head band and slightly to the right to form the dog ’ sec collar .

Step 7 : Draw role of the body set out from the left edge of the collar , apply a simple slightly cut line downward to the right . Then , attract the first front branch using a mere ‘ U ’ form .

Measure 8 : Draw the dog ’ s back and hind part of the torso , along with the hind leg closest to us , using the same ‘ U ’ flesh as the front leg .

Step 9 : Draw the lower portion of the dog ’ sec torso by associate the two legs from the former pace with a slightly cut note in the center . From the spine of the torso , add a mere shape with a pointed goal to form the tail . Cause this a single , continuous melody .

Pace 10 : Pull the two remain leg . Start with the front leg , which start out near the start of the line we previously make from the collar , and follows the same “ U ” form . Then , add the back branch , using the same shape but make it noticeably smaller , as only part of it is visible from this perspective .

Pace 11 : At this stage , we ’ ve successfully learned how to attract a simple so far detailed and adorable dog . If there are any unfinished detail , remove a instant to complete them . Carefully erase the visible parts of the circle from Step 1 that overlap with the ear , removing any unnecessary lines for a cleaner feeling .
3 – How to Draw a Cute and Smiling Cartoon Dog in 10 Mere Stairs

Pace 1 : We ’ ll start by create the outline of the dog ’ sec mind , start out from the height of its snout . Draw a single , continuous note set out on the correct side , arch downward to the left , then upward , and finally back to the right . This will form a still , utter outline for the dog ’ s brain .

Measure 2 : Draw a large oval for the nose . Then , add two smaller oval for the eyes , each about half the size of the nose , but make the center on the correct slope slightly little than the ace on the left for a playful , cartoonish result .

Step 3 : Draw two black-filled oval for the student inside the eyes . Add two curl eyebrow above the middle , angled in different directions for a cartoonish style . Then , draw a large arc starting from the bottom center of the nose oval to the left , create the dog ’ s smile .

Pace 4 : Depict the outline of the ear on both sides of the top of the mind . Get them hang up down playfully in a cartoonish style . The ear on the right slope of the head should be smaller than the ace on the left . In the middle of the top of the head , draw two small shapes to represent a tuft of fur sticking up .

Step 5 : Attract a single , continuous course starting somewhat to the left of the bottom edge of the top dog shape . Get the course down somewhat , arch it to the left , and then smoothly arc it downward to form the dog ’ s back and rear leg . Preserve the job to the right , round it off to create the frame of the hand .

Step 6 : Attract the front branch and paw , duplicate the same pattern as the rear leg from the previous pace , but without including the line that formed the back .

Pace 7 : Add a vertical melody to the front branch to wind up its shape . Then , attract a curving melody set out near the hand and hold out upward toward the center of the bottom of the dog ’ s brain to spring the torso .

Step 8 : Attract the hand of the second front branch , which is visible from our position .

Pace 9 : Attract a spiral-like shape with a single continuous line to shape the seat . Add a vertical line to define the pattern of the second presence leg . Use somewhat curved lines to separate the hand trudge into section on all the dog ’ sec paws . Ultimately , lend a small , subtle low body section and a course to divide the ass leg .

Step 10 : At this step , we ’ ve complete our cheerful , adorable cartoon dog attract . I guess this one cost perfect for creative activity with kids as it is pretty cute and easy to make . Take a second to go over your drawing , polish any areas , adjust the details , and add or remove elements as demand to attain a polished , finished look .
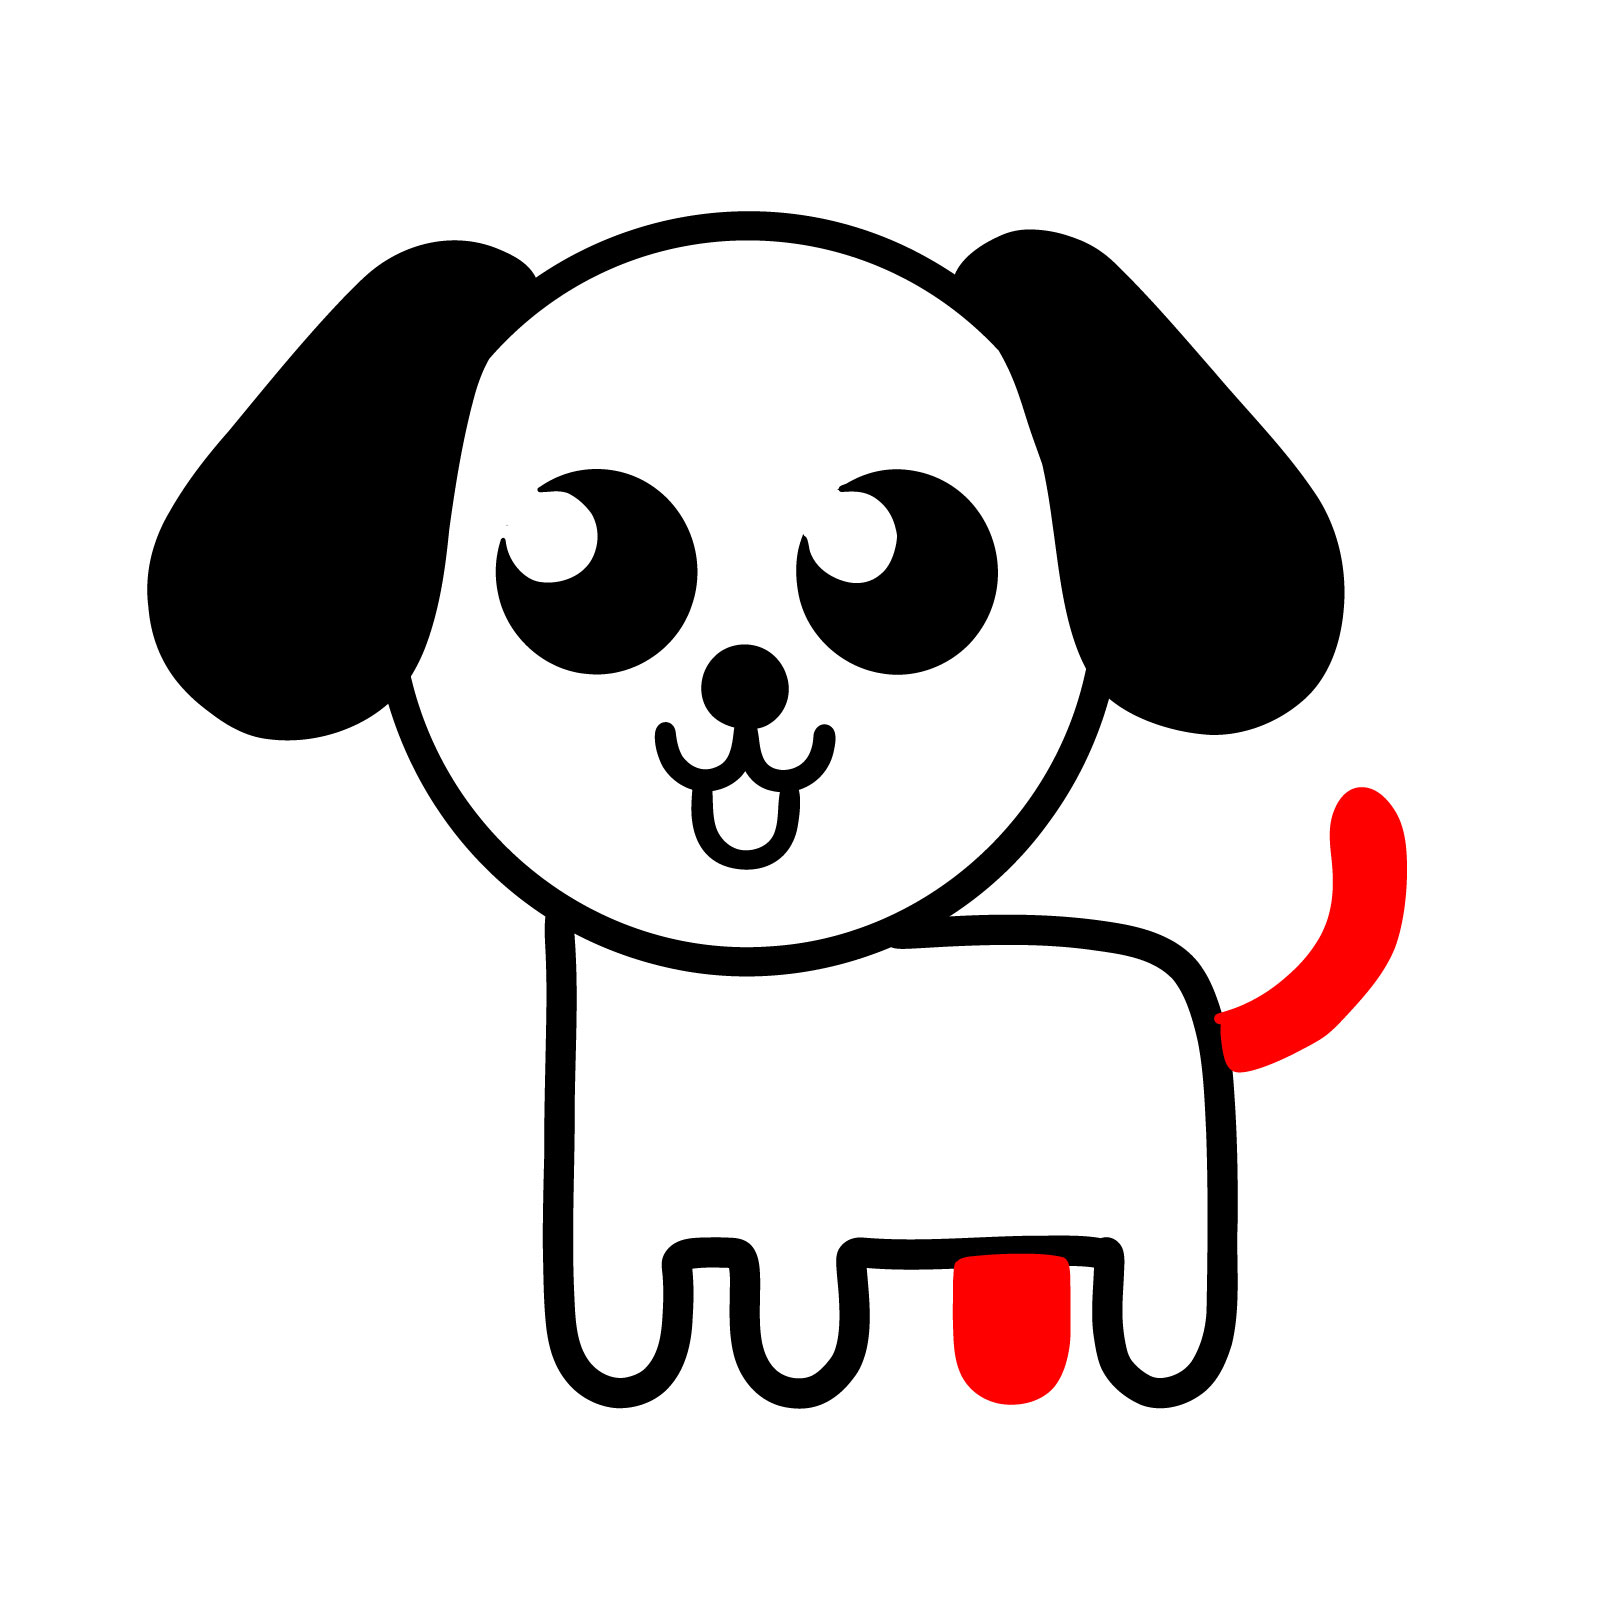
4 – Happy Cartoon Dog Drawing in Full Body with Big Eyes

In this guide , we ’ ll bring things a measure farther by attract a happy , full-body cartoon dog with large , expressive eyes . This version live slightly more detailed than the previous one , capturing a second more realism while yet preserve its playful and cheerful cartoon vibe . Whether you want a more artistic and magnified look or a elaborate yet whimsical drawing , this guide and the previous one be both utter for creating your ideal cartoon dog ! Let ’ s start—this one will be discharge in fourteen steps .
Step 1 : We ’ ll skip the basic resume and commence drawing at once . Commence by drawing the top role of the dog ’ s mind as a still arc associate the space between the ears . In the middle of this arc , lend two humble pattern to represent tufts of fur sticking up on the top of the dog ’ s brain .

Step 2 : Draw the dog ’ sec ears , which hang down in a relaxed and playful mode . They start on the sides of the line drawn in Step 1 , curve slightly outward , and hang down to about the heart of the dog ’ s top dog , stopping merely abruptly of arrive at it .

Pace 3 : Draw a curved melody , like a semicircle , starting from the lower role of the ear . This line will connect them and form the heart and lower outline of the cartoon dog ’ s head .

Pace 4 : In the center of the dog ’ sec head , trace a horizontal oval to create the nose . Then , attract somewhat elongated circles , or ovals , for the eyes . These should be somewhat prominent than the nose and positioned slightly above the center of the head . The spacing between the center oval should exist approximately equal to the size of one center oval .

Step 5 : Fill the nose oval with black , leaving a small horizontal oval at the top for a highlight . For the eyes , leave a large white circle near the height and a smaller one somewhat lower and to the right , creating playful cartoon reflections .

Step 6 : Draw incomplete circles around the middle to draft and form them . Beneath the nose , outline a wide , smooth , attack “ W ” frame to spring the cheeks / the lower region of the dog ’ sec snout .

Pace 7 : Future , draw eyebrow above the dog ’ s eyes to emphasize its cartoonish look . Below the broad “ W ” flesh from the former measure , sketch a broad “ U ” shape to shape the mouth . Fill this shape with dark , leaving the tongue area uncolored to lend depth . Additionally , draw small lines at the ends of the “ W ” shape to draft the corner of the mouth .

Pace 8 : Trace a single , still , curved line starting somewhat to the right of the humble part of the dog ’ s brain . Extend the line downward , curl gently to the right , and then sloping further down to spring the spine , ass , and the beginning of the hind leg . Somewhat to the left , add another curving job to form the upper part of the dog ’ sec hind leg .

Step 9 : Pass the note from the former measure further down and slightly to the right . Then , curve it smoothly downward , grow it to the left , and add a little rounded piece at the goal to form the rear of the hind branch and the outline of the paw .

Step 10 : Somewhat to the left of the seat of the dog ’ s mind , make a smooth , curving note that flows downward and bends to the right , shaping the presence of the neck and body . From the end of this course , depict a simple presence leg that is close to us .

Step 11 : Pull a smooth line connect the space between the front and hind legs already draw . Then , from the paw of the hind branch , add a vertical line to discharge the outline of the hind branch .

Step 12 : At this stage , draw the two missing legs : one presence and one hind branch . They closely mirror the form of the branch already attract , with slim adjustment , as they live partly hidden behind the dog ’ sec body .

Step 13 : At this stage , make the ass for your cartoon dog , curving it upward to rival its cheerful demeanor . Additionally , lend little , somewhat veer job on the dog ’ sec hand pads to separate them into sections for more detail .

Step 14 : At this phase , we ’ ve complete our cartoon dog drawing , radiating happiness with its burn eyes , exposed mouth , and a ass apparently ready to wag . Today , take a second to reexamine your work for any missing details or corrections that might exist call for . If you bid , you can draft your resume with a pen . Once the ink is dry , erase any remaining pencil note to devote your drawing a polished face .
5 – Draw a Minimalist Dog : Simple and Elegant

Step 1 : In the upper left country of your drawing space , draw a smooth , rounded shape and fill it with dark to create the dog ’ sec nose .

Step 2 : Draw the upper role of the dog ’ sec snout , begin from the upper leave corner of the nose drawn in the previous measure . Then , lend the low part of the snout , or the dog ’ sec cheek , using still , curving business beneath the nose , as shown in the pace ’ s reference .

Step 3 : Draw the outline of the top of the dog ’ s brain and the ear closest to us . Use a single , continuous line starting from the upper part of the dog ’ s snout to shape both the head and the visible ear .

Measure 4 : In this measure , draw a little connecting tune beneath the lower piece of the dog ’ s snout to form its chin or lower jaw . Then , to the left of the chief , lend a curved line to indicate the visible piece of the second ear . Finally , place two black oval above the stage of the snout to produce the dog ’ s middle .

Pace 5 : Attract the neck and the front portion of the dog ’ s body with a single , continuous line , starting from the lower part of the snout and curving smoothly downward to the right . From thither , trace the first front leg , the one closest to us , and add little separators on the paw to fix its department .

Measure 6 : Draw a course to draft the rear of the neck , the dog ’ s back , and the rear part of its body . In the same step , complete the rear branch on the side closest to us , assure the outline is still and continuous .

Step 7 : Draw the lower part of the dog ’ sec body , get in touch the presence and rear legs with a smooth , curving line . In this measure , also lend the seat , which hangs naturally behind the rear branch .

Step 8 : Depict the two missing legs , one presence and one back , mirroring the shapes of the legs already draw . These should succeed the same structure and proportion .

Step 9 : At this stage , your minimalist dog drawing cost complete . Remove a minute to control for any unnecessary target or blot from the pencil and cautiously clean them up . If there are any missing point from the former steps , add them now . As with the early drawing , you can outline it with a pen and , once the ink is dry , erase all the pencil business to finalize your work .
6 – How to Make a Dog Face : Easy Front View Drawing for Beginners

Measure 1 : Start by drawing a circle as the base and foundation of your drawing . Inside the band , sketch a erect and horizontal melody to divide it into four equal part , score the middle . Extend the vertical melody downward by about a quarter of the circle ’ s height . Then , lend lines on the side and bottom to shape the side and lower role of the dog ’ s top dog .

Pace 2 : Depict a horizontal oval in the humble region of the base circle to point the posture and shape of the nose . From the edge of the nose oval , lead two note upward to meet the horizontal guideline from the previous measure . At the ends of these line , depict two circles to mark the status of the middle . Starting from the midpoint of the extended erect course below the band , draw two lines lean toward the corners of the low part of the dog ’ s head shape . Finally , outline the outer figure of the ears with simple course , set out from the upper part of the mean circle .

Step 3 : Draft the flesh of the nose as express in the reference for this step . Then , make the dog ’ sec cheek , begin from the middle of the lower share of the nose figure . These cheek form a “ W ” -like shape but with soft , rounded edges .

Measure 4 : In this step , make the slope of the dog ’ s head , connecting them to the outer edge of the cheek . Use multiple slightly veer line to mimic the texture of the dog ’ sec fur , produce a more natural appearance rather than a firm tune . Similarly , use like fur-like lines to sketch the lower jaw or chin of the dog .

Pace 5 : Add some detail to the dog ’ sec nose by draw nostrils determine like commas . Set them as prove in the address for this measure to reach a natural look .

Step 6 : At this stage , pull the eyes by creating dark circle , leaving small domain uncolored to service as highlights . These circles should exist about one-third humble than the guide circles drawn in Step 2 , as they will represent the entire heart , not just the pupil .

Step 7 : Using the guide circle drawn in Step 2 , darken and lend shading and details around the heart to enhance their depth and frame . Focus on creating a natural look that reflects the contours of the dog ’ s face .

Measure 8 : Add short stroke along the snout to leave additional item and flesh . These strokes should mimic the texture of fur , enhancing the realism of the dog drawing .

Step 9 : Now , we ’ ll attract the ears and the crest of the dog ’ s head , discharge the outline of the mind . Refer to the illustration for this step as a guide . Expend a series of short , textured lines for the upper piece of the ears and the top of the brain to mimic fur and add detail . This will assist the drawing look more natural and less set .

Step 10 : Depict the dog ’ sec neck apply short , textured lines to represent fur . This will lend point and make the neck come out more natural and lifelike .

Step 11 : Add the last details to complete your sketch . Draw short strokes at the base of the ear to depict additional fur and texture . Add smooth , swerve job above the center to make the upper eyelids . Use little fur-like business to add texture to the dog ’ s eyes and the crest of its head . If you recall early areas could expend more fur texture , sense free to lend it . Add short shot at the lower part of the neck to indicate the visible region of the dog ’ sec body . Eventually , place small dots on the cheek to represent the whisker sign .

Measure 12 : With the drawing now utter , choose a moment to review it . Add any miss detail and reach necessary corrections . Once satisfied , erase all the guidelines drawn in Steps 1 and 2 to have the describe a cleaner appearance . For a crisp , finalized result , you can trace over the significant course with a pen or ink . After the ink has dry , cautiously erase all remaining pencil marks and survey .
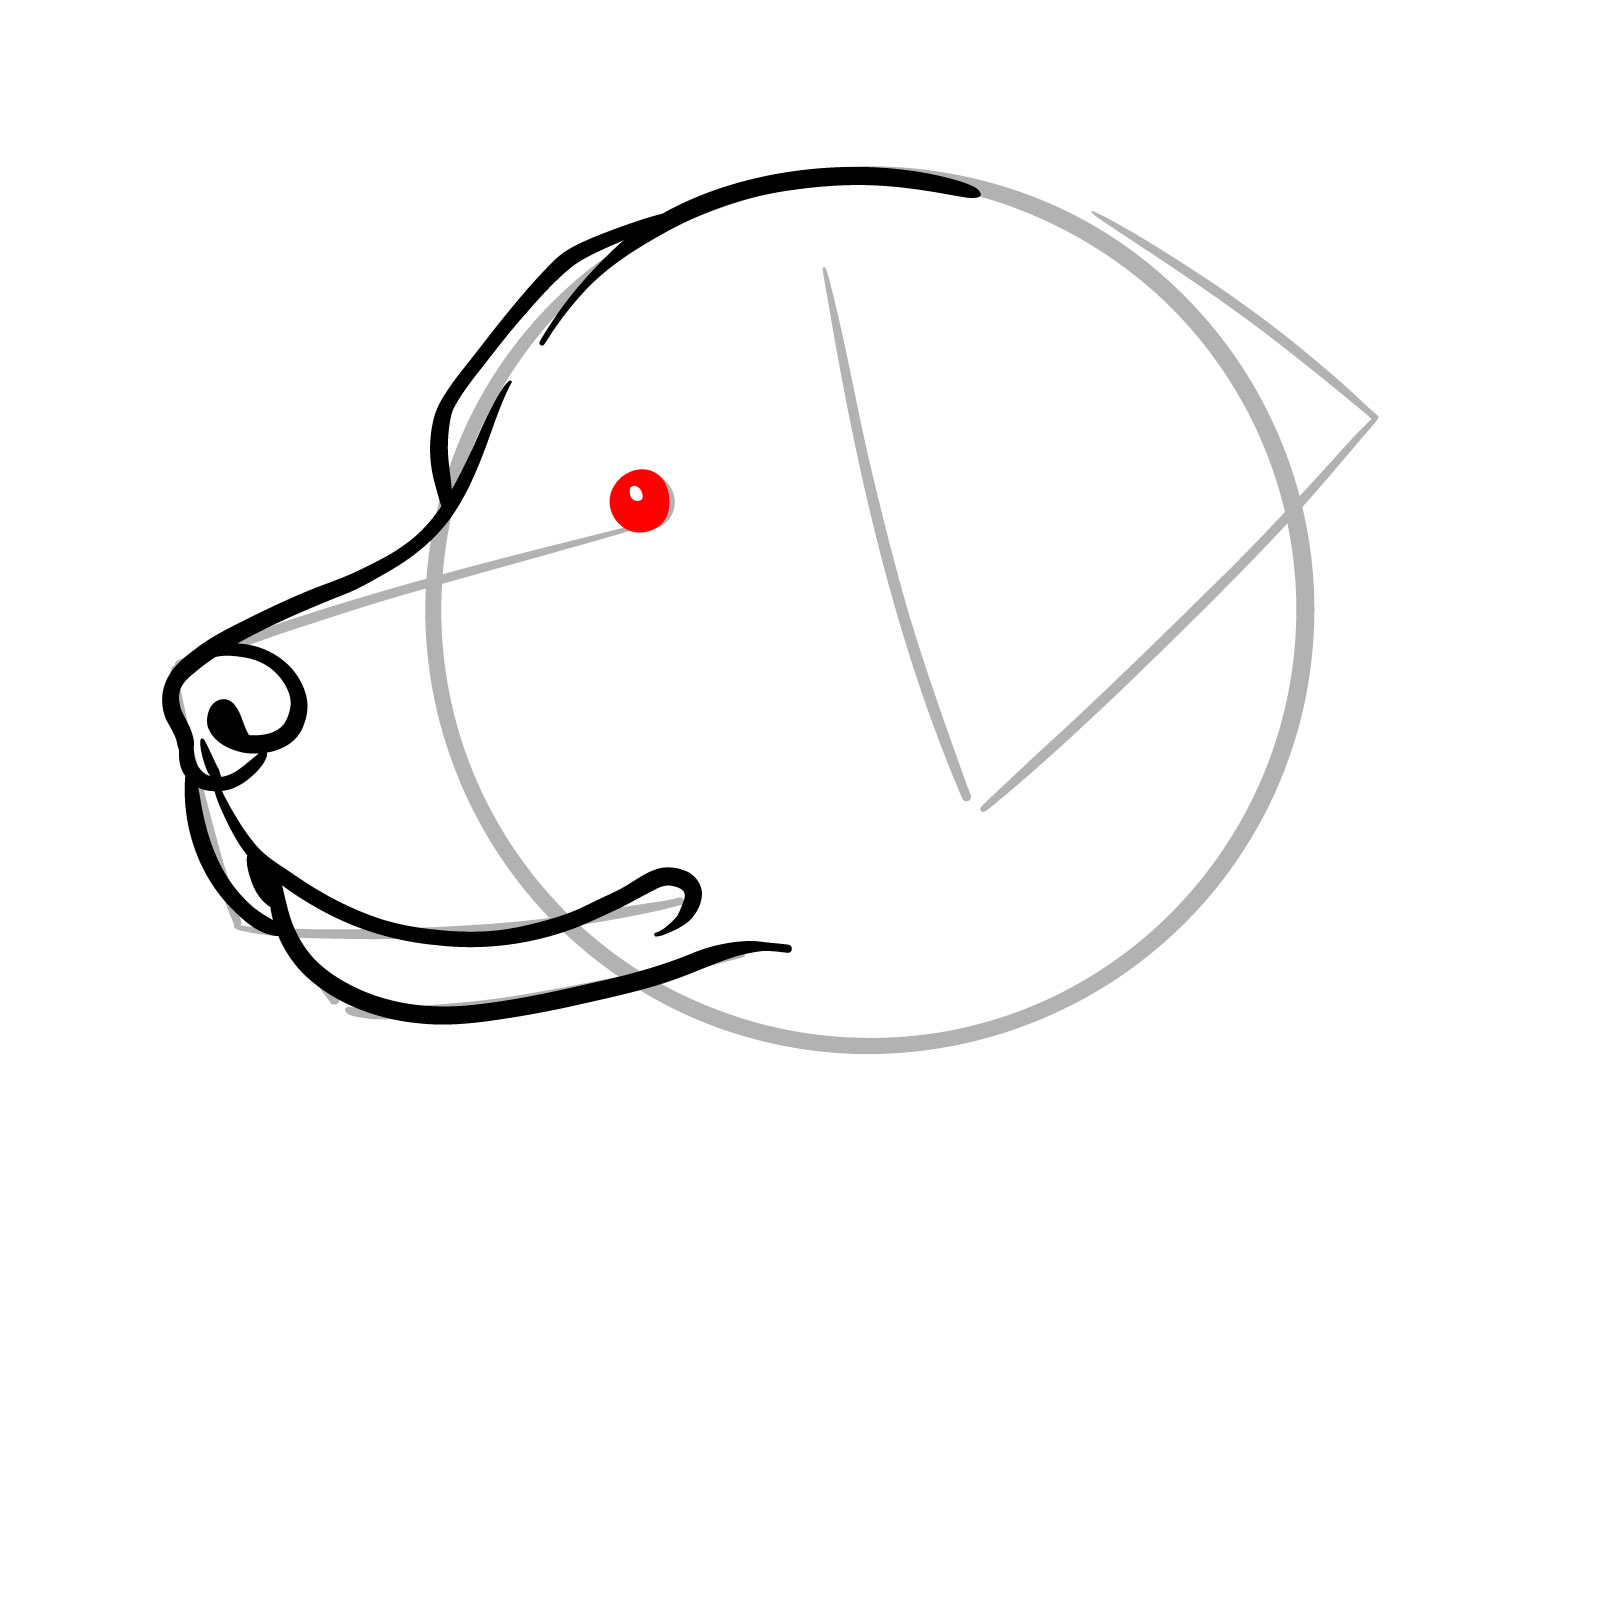
7 – How to Depict a Realistic Dog Head : Side View in 11 Easy Measure

Measure 1 : Start by describe a lot to serve as the floor of the dog ’ s chief . In the upper left portion of the circle , near to the center , depict a small band to indicate the eye ’ s attitude . From this smaller lot , use mere course to outline the upper region of the dog ’ s snout , prolong to the left , downward , and back to the right . Beneath this shape , draw note for the humble part of the snout and the lower jaw . Finally , in the upper correct part of the circle , survey simple lines to outline the shape of the dog ’ s ear .

Step 2 : Draw the shape of the dog ’ s nose and lead the upper part of the snout into a smooth curve upward to make the forehead .

Pace 3 : Draw a single , continuous curved tune start from the heart of the lower part of the nose . Lead the line downward , then to the right , and in the end curve it downward in a hook-like form . This note will represent the dog ’ sec cheek closest to us , as well as its mouth .

Step 4 : Depict the low part of the dog ’ s snout or low jaw expend a still , arch tune base on the initial sketch from Step 1 . Additionally , lend the visible portion of the second cheek on the far slope , a small point starting from the left slope below the nose .

Step 5 : Draw two mere lines to form the dog ’ s forehead and the top of its head , apply the lot from Step 1 as a guide .

Step 6 : In this step , draw the dog ’ sec middle . Within the circle from the initial sketch , create a black circle , leaving a small share uncolored to stand for a highlight for the dog ’ s eye .
Step 7 : Add detail and shading around the dog ’ s heart to define the shape of its head more clearly and enhance the depth of the center .

Step 8 : Trace the outline of the dog ’ sec ear , the one visible from our position . Use a single , continuous line based on the simple guidelines from the initial survey .

Step 9 : Draw simple business initiate from the right edge of the ear drawn in the former step to outline the rear of the neck . Then , add a smooth curved line extending downward from the abject role of the dog ’ s snout to complete the neck . Finally , include a few additional course beneath the ear and mouth to specify the humble part of the dog ’ s head .

Pace 10 : In this step , lend the last point to the dog ’ s side profile . Shade the corner of the dog ’ s mouth with black to set it further . Add additional lines to emphasize the shape of the chief . Include little dots on the cheek to make up whisker marks , and draw curl business around the heart to enhance the head ’ sec structure and realism .

Pace 11 : You ’ ve today discharge the drawing of the dog ’ s head in a slope opinion . In this step , review your work to add any miss detail or adjust existing ones . Carefully erase the initial survey from Step 1 to clean up the dog drawing . If you wish , trace the key lines of your finish sketch with ink or a pen . As mentioned before , once the ink exist full dry to keep smudging , erase all remain pencil mark to accomplish a crisp and polished drawing of the dog ’ s head slope opinion .
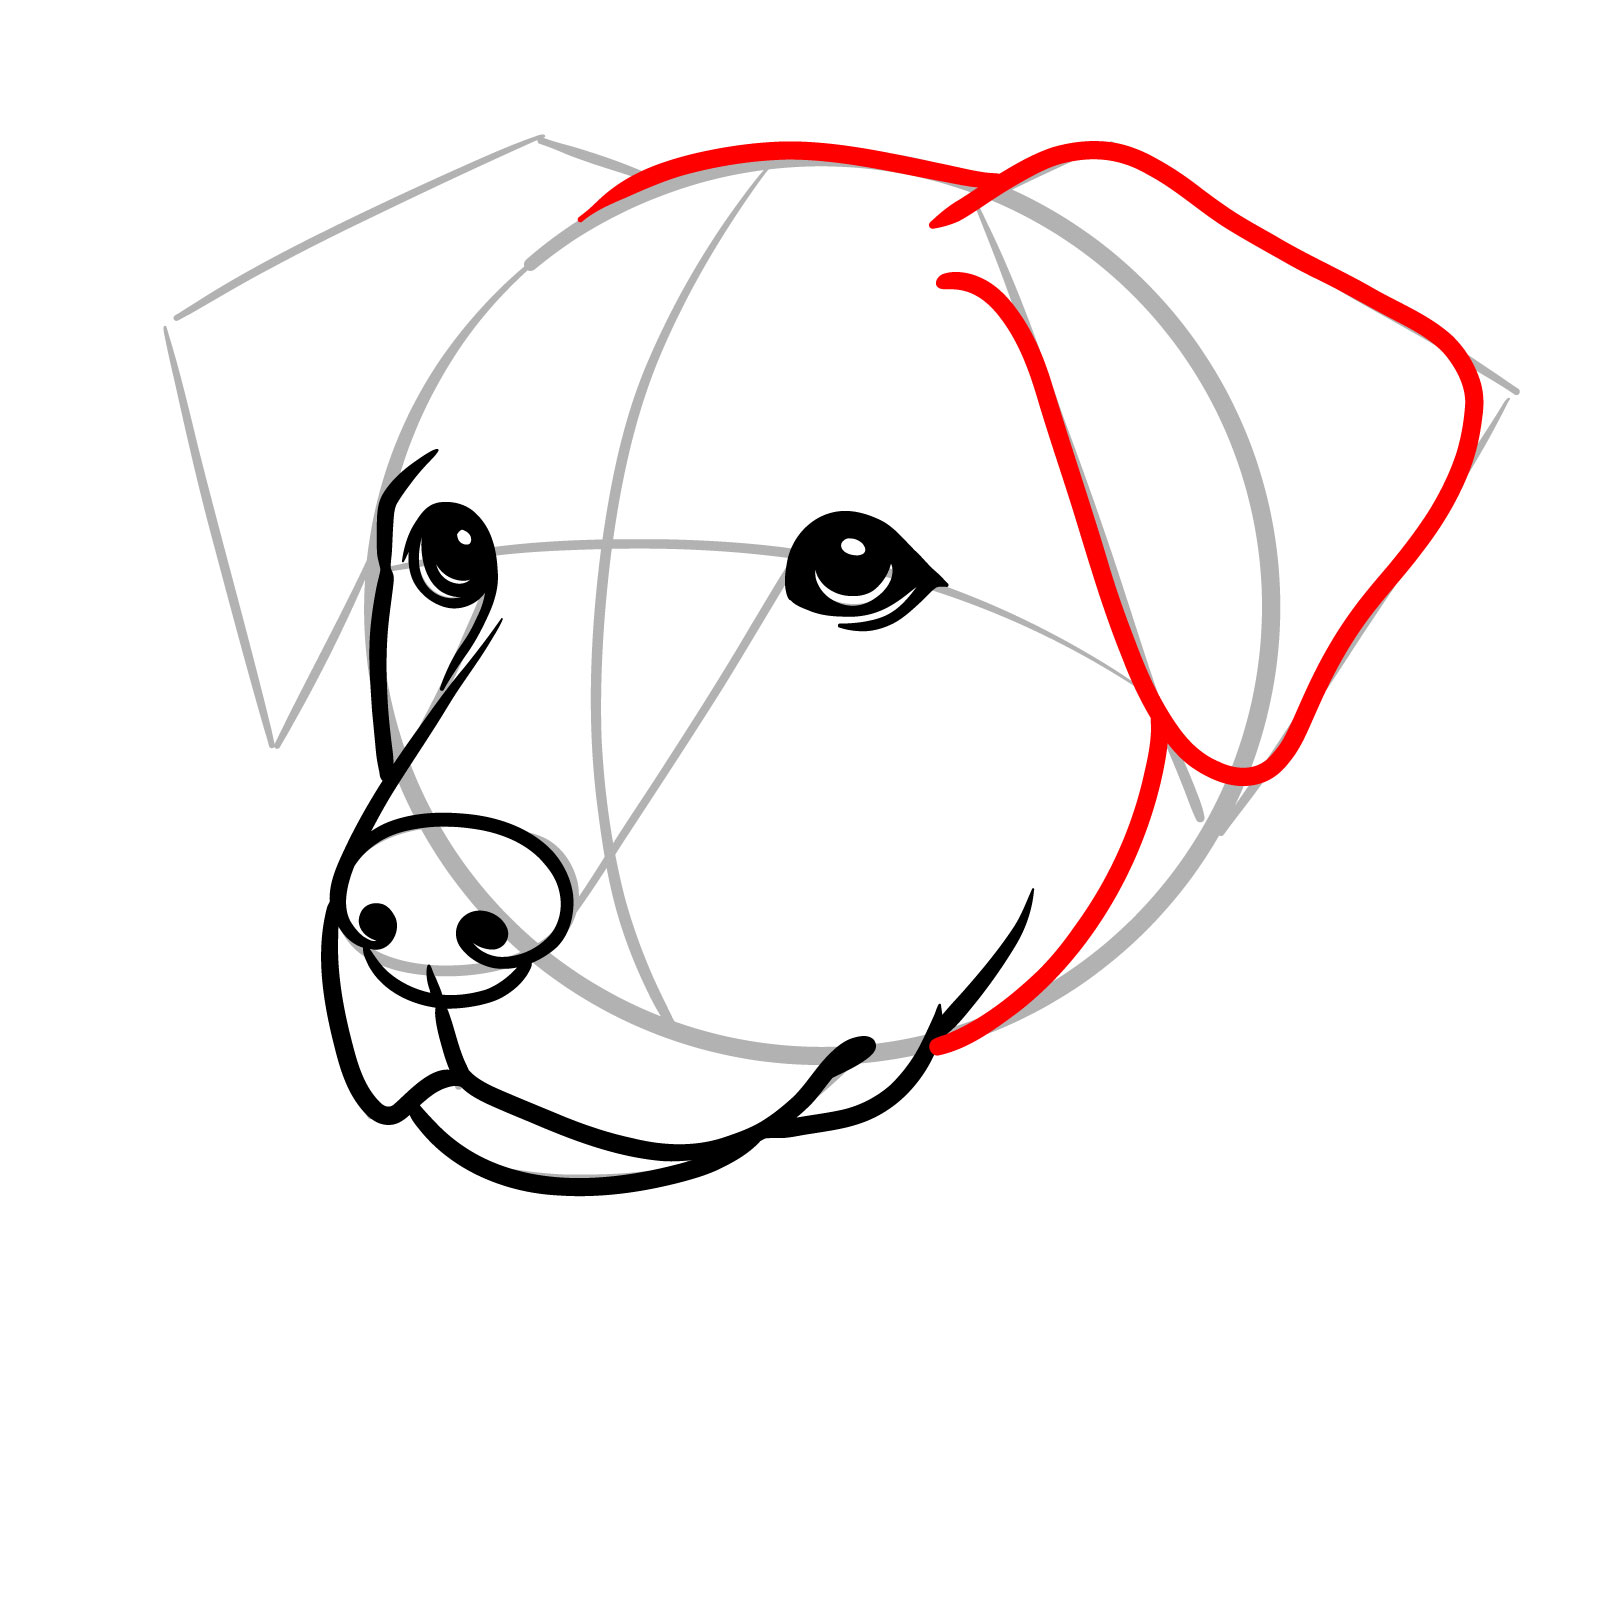
8 – Dog ’ s Head Drawing in Three-Quarter View : 13 Steps

Pace 1 : Start by describe a lot as the stem for the dog ’ s top dog . Within the band , draw two curved lines—a erect and a horizontal one—that intersect at the middle . These lines will assist indicate the chief ’ s direction and volume .

Step 2 : Draw two circles on the horizontal line from Step 1 to mark the placement of the dog ’ s eyes . From the inner edges of these circles , extend two course toward the nose . The nose will be a horizontal oval , noticeably bigger than the middle . Using simple line , shape the low role of the dog ’ s snout as prove in the reference . Finally , sketch the basic shape of the dog ’ s ear with simple business , start from the crest of the base lot from Step 1 .

Step 3 : Draw the chief frame of the nose and add the nostrils as indicate in the reference . From the left edge of the unfinished nose oval , draw a line extending toward the center to spring the upper part of the dog ’ s snout .

Pace 4 : Complete the outline of the nose and make the dog ’ sec cheek , shaping them with smooth curve . Begin outlining the mouth to establish its sort .

Step 5 : Inside the circles marking the heart from the alkali survey , pull two humble black-filled band , leaving humble uncolored sphere for highlights . These band should cost smaller than the original sketch band . Refer to the illustration for this measure to ensure proper sizing of the eye .

Pace 6 : Add details around the center to enhance their depth and shape . Use shading and line to define the shape of the eyes and the surrounding region , helping to form the dog ’ s head more realistically .

Measure 7 : Make the low share of the dog ’ s mouth , include the low jaw and chin . Run the business upward and to the right to finish the lower part of the snout . In this step , too attract a line to outline the left side of the dog ’ sec chief , set out from the height of the snout and curving somewhat upward and to the right above the following center .

Step 8 : Pull the top outline of the dog ’ s top dog and add a continuous melody to form the ear on the right , in full visible from our position . Once the ear equal drawn , add a curving tune extending from the abject leave edge of the ear to the bottom of the snout to discharge the humble part of the dog ’ s top dog .
Pace 9 : Draw the second ear on the left slope using a single line . Base the shape on the initial resume create at the beginning .

Step 10 : Add a few business on the left slope beneath the dog ’ s lower jaw and some line on the correct side under the ear to shape the visible region of the neck in your drawing .

Measure 11 : Add details around the center apply mere note , as shown in the reference . This will help polish the figure of the dog ’ s head and emphasize the eyelids and the area surrounding the heart .

Step 12 : Lend the finishing item to your drawing of the dog ’ s head in a three-quarter view . Draw humble dots on the cheeks to indicate whisker target . Include somewhat curved business to enhance the shape of the dog ’ sec snout and cheek . You can also add curving job along the inner role of the ear to give them a sense of depth and volume .

Step 13 : You ’ ve now completed your drawing of the dog ’ s head in a three-quarter scene , with all the necessary details add . At this stage , you see a finished resume without the stand lines , then take a instant to review your study . Add or remove any details as require , and cautiously erase the base sketch to assert the make ’ s clean appearance . Optionally , as with all previous and future drawings , you can trace your complete survey with a pen or ink for shrill , clearer line . Once the ink has dry , erase all stay on pencil marks and guidelines for a polished last look .
9 – Draw a Sit down Dog : Front View in 15 Mere Steps
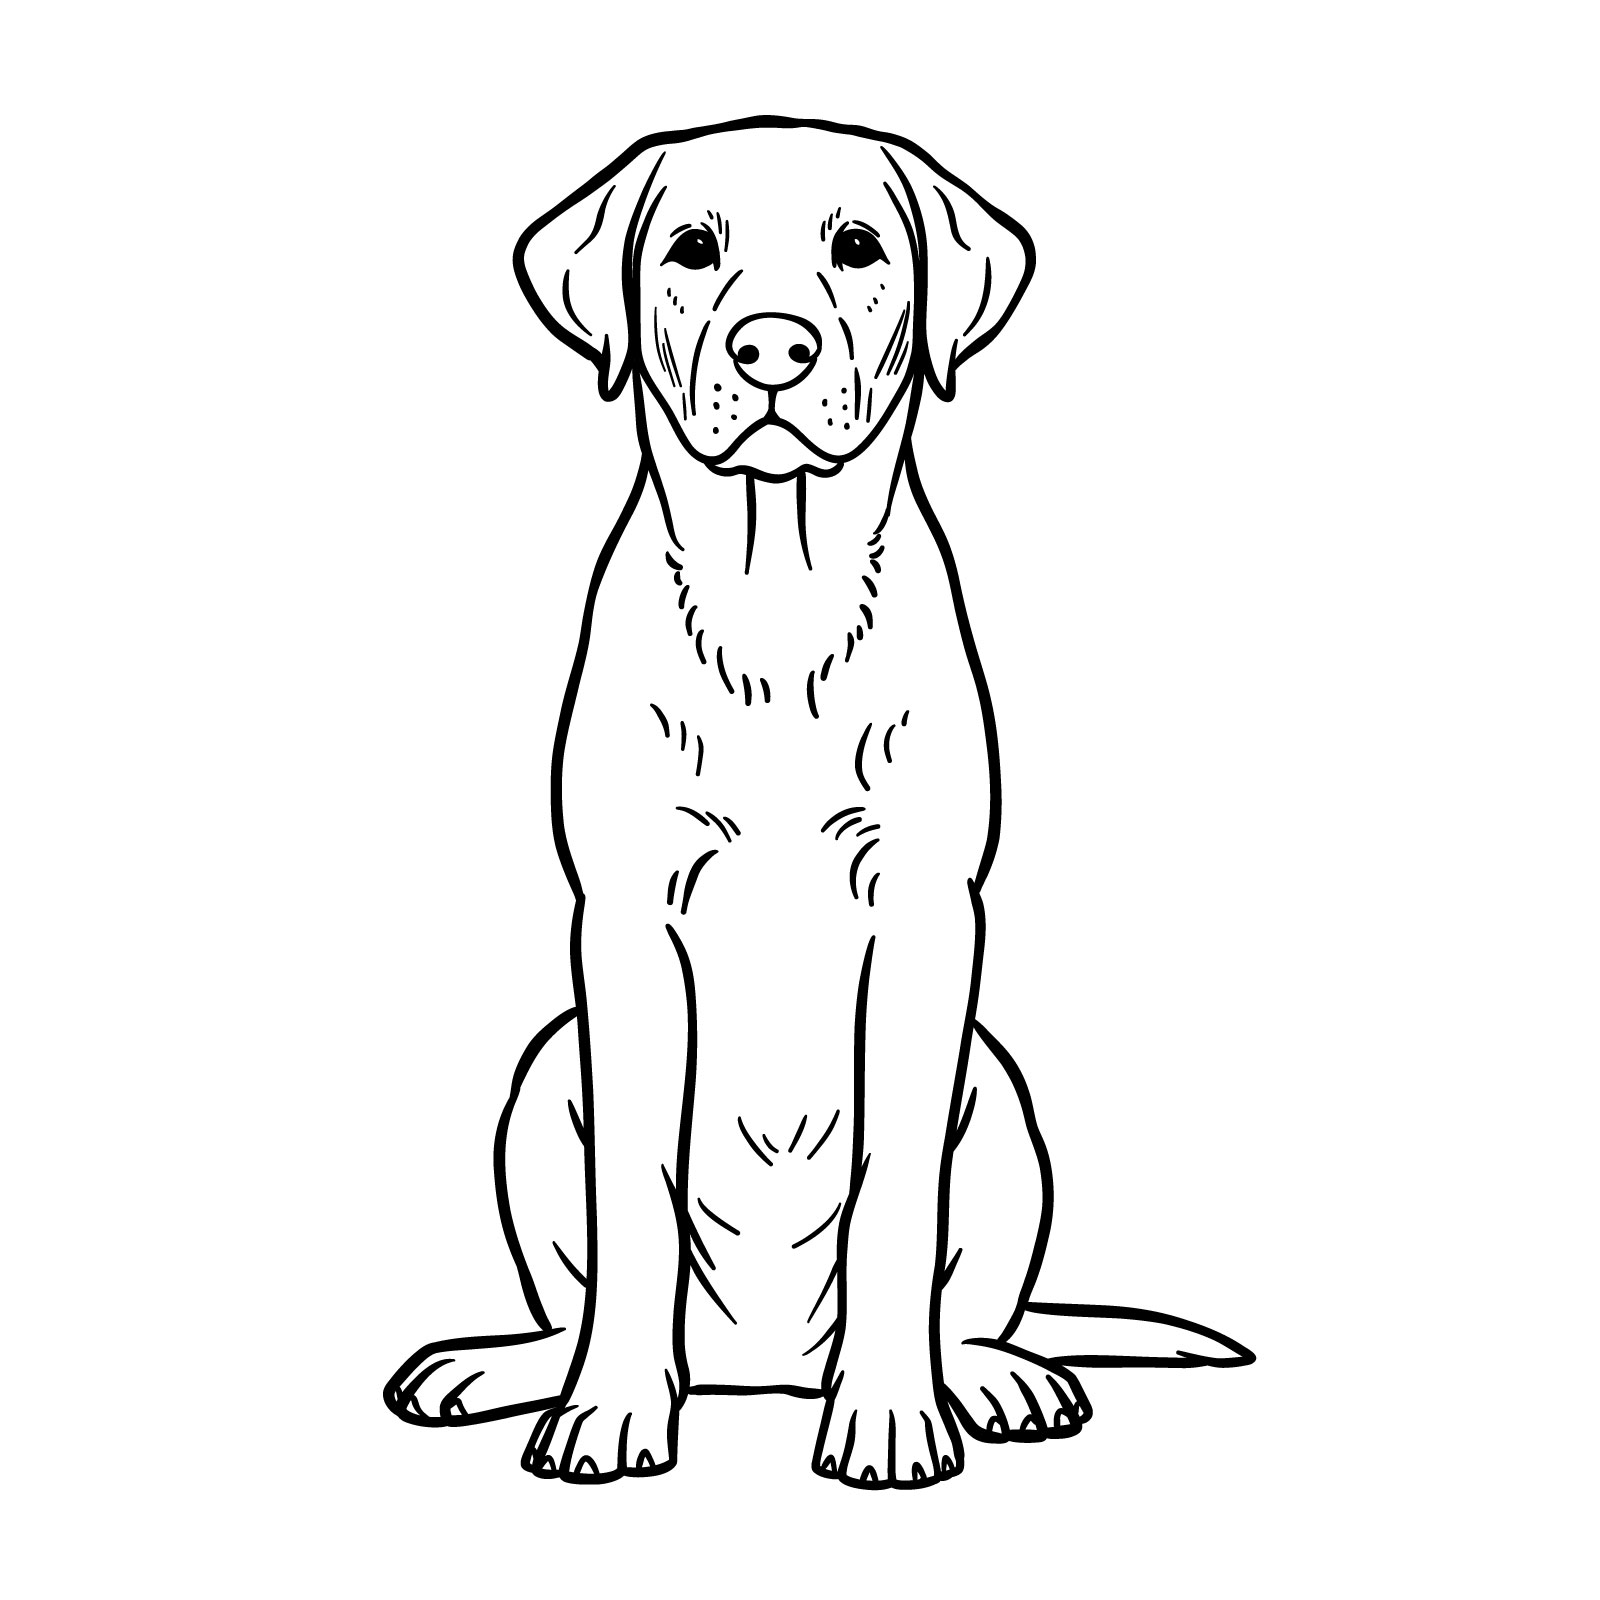
Step 1 : Begin with a basic sketch , using real light pencil lines to ensure they put on ’ t overpower the primary drawing and can be easily erased later . For this step , draw something resembling a snowman using three shapes . Start with the smallest lot at the top—this will function as the base for the dog ’ s mind in the front view . Below it , at a slender distance , trace a slightly bigger circle for the upper body . Beneath that , apply two simple curved course stretch downward from the side of the halfway circle to form the legs in the pose pose . Add a horizontal job at the bottom to represent the base where the dog is sitting . At last , relate the head circle and the halfway circle with two lines on each side to make the neck and the source of the upper torso .

Step 2 : Exactly above the lower edge of the chief lot , trace a horizontal oval to stand for the position and shape of the dog ’ sec nose . From the outer edge of the oval , extend two line somewhat outward and upward . At the ends of these business , pull two circle to note the position of the eyes and serve shape the dog ’ s snout . Beneath the nose , use simple lines to take off forming the snout , cheeks , and chin . On either side of the head lot , draw simple flesh to draft the ear . These business should stay on light , notice the basic structure . Starting from the low sides of the halfway circle ( symbolize the upper body ) , draw simple lines downward to determine the movement legs . At the bottom part , sketch the rear paws with simple note to point the sit down pose .

Measure 3 : Pull the dog ’ sec nose and nostrils as shown in the mention for this pace . Focus on shape the nose details accurately .

Step 4 : Draw a erect line starting from the ass of the nose and reach out to the low edge of the head circle . From this line , make two additional curved business on either side , organize a “ W ” -like pattern . These job will outline the cheek and the side of the dog ’ sec chief , associate up to the ears .

Step 5 : Complete the outline of the humble share of the dog ’ s head by drawing its chin and humble jaw . Then , on both slope of the head , draw two hook-shaped line to represent the inner edges of the ears that equal near to the head and hanging downward along its side .

Measure 6 : In this measure , use a single continuous course to attract the dog ’ s ears and the top of its head . Refer to the illustration provide and replicate the curve and shape of the note to make realistic shape for the dog ’ s head and ear .

Measure 7 : It ’ s time to attract the dog ’ s heart . Produce two black-filled circles , leaving little uncolored areas for reflections to have a more realistic look . Place these band where the center live note in the basis sketch .

Step 8 : Add some details and depth to the eyes . Draw lines and shading around the eyes as prove in the mention to enhance their Platonism and structure .

Step 9 : It ’ s time to prompt on to the dog ’ sec torso . Trace its neck and the sides of the upper body using the guidelines created in Step 1 . Associate the head lot to the middle circle of the body to define these parts .

Pace 10 : Draw the dog ’ sec front branch in good , including the hand . Add line to separate the hand into separate sections for a more realistic face .
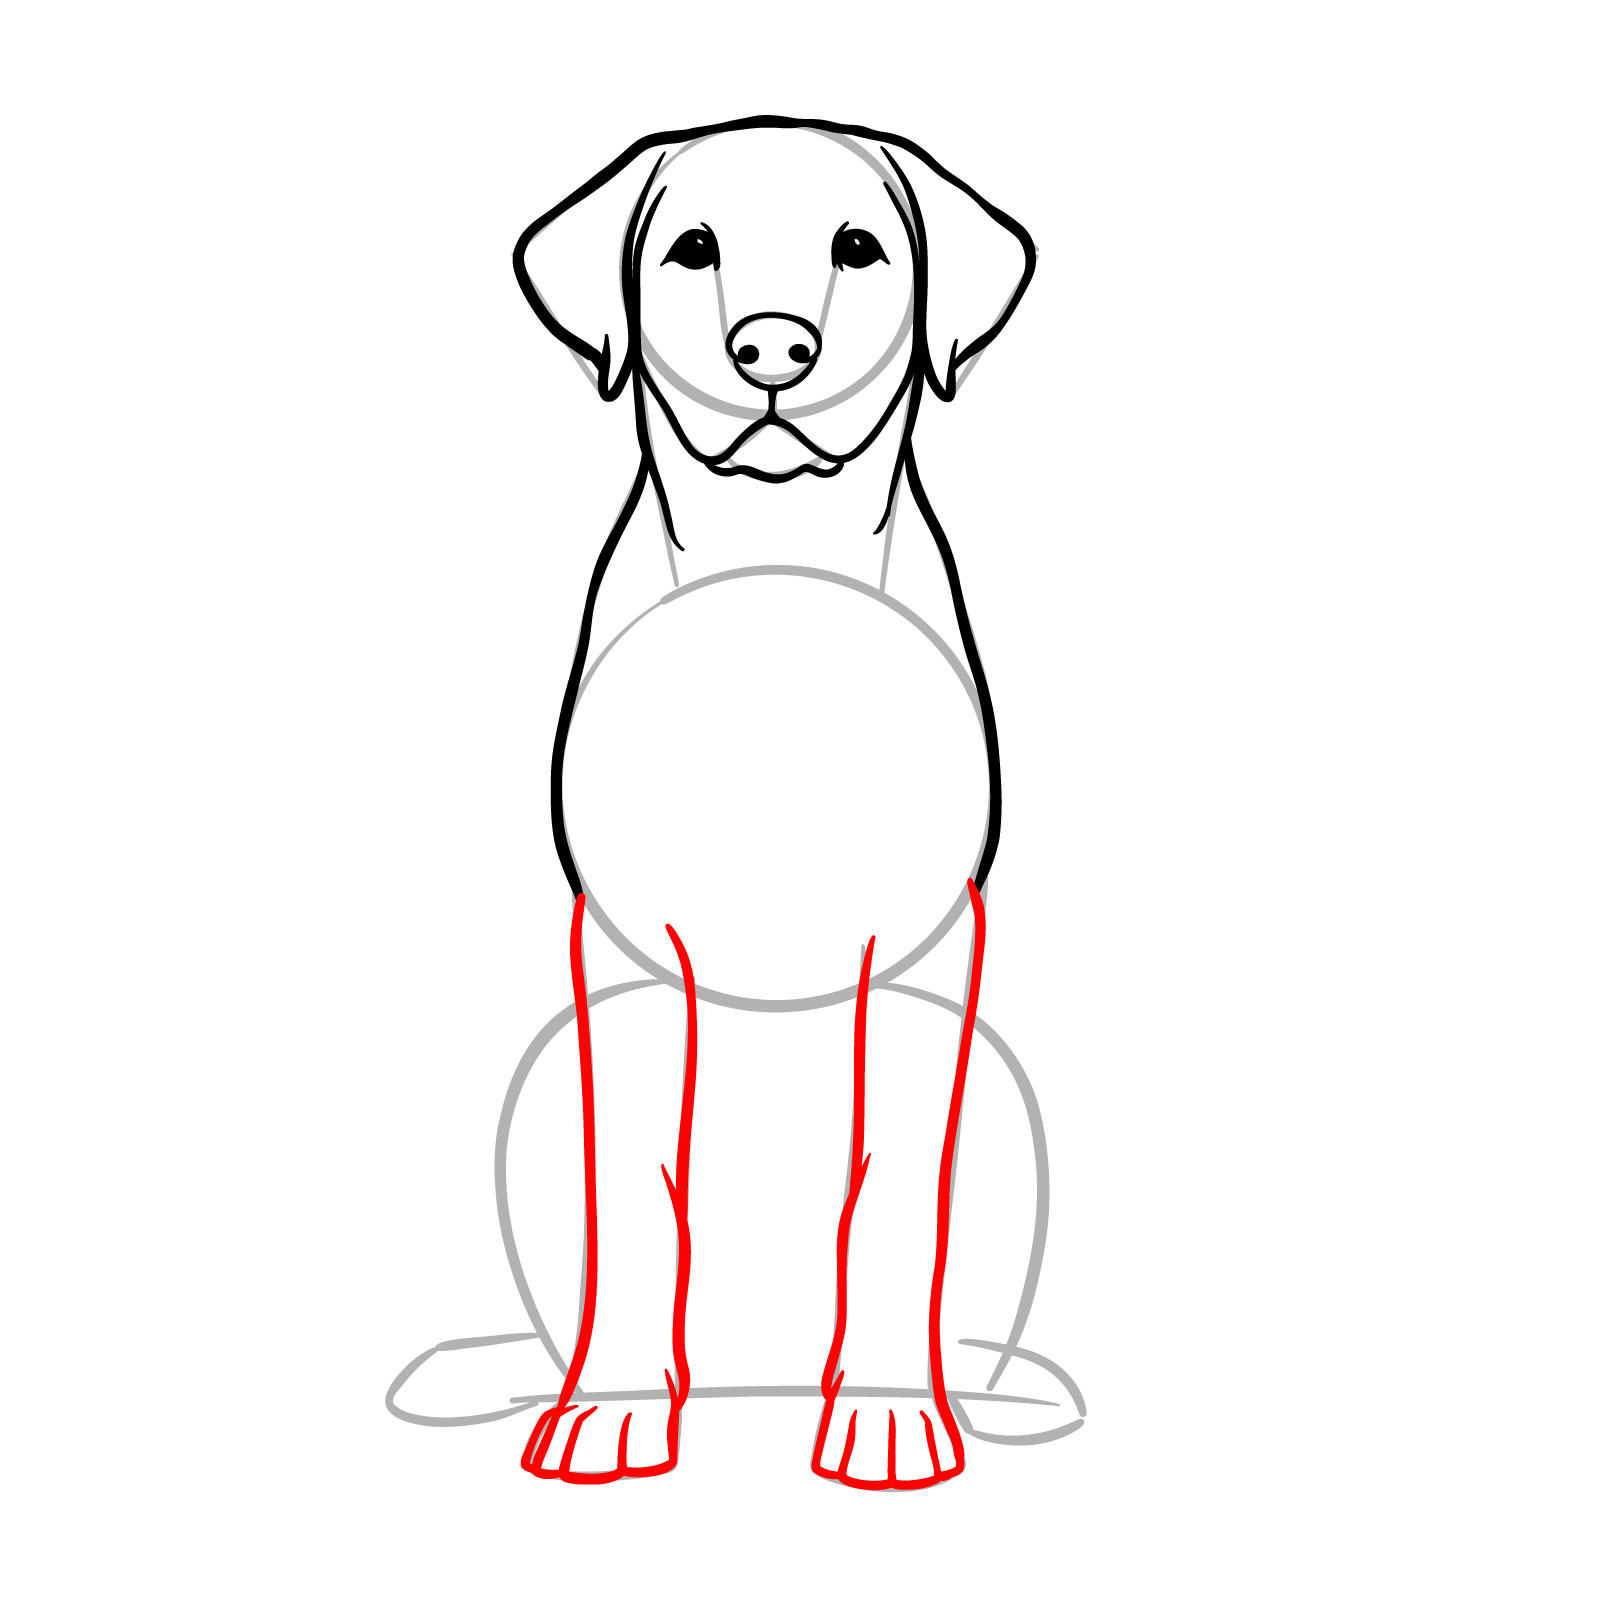
Step 11 : Based on the curved course draw before to mark the back leg in the sit down pose , draft them using somewhat uneven , not absolutely still line . This will lend realism and a sense of texture to the drawing , have it more character than mere straight lines .

Step 12 : Draw the dog ’ s back hand in the seat pose , dividing them into individual department for added detail . Expend the base sketch from Step 2 as a guide to ensure exact positioning and proportion .

Measure 13 : Complete the lower part of the dog ’ sec body by drawing a little line connecting the front legs . Additionally , outline a mere tail on the right slope , resting on the earth .

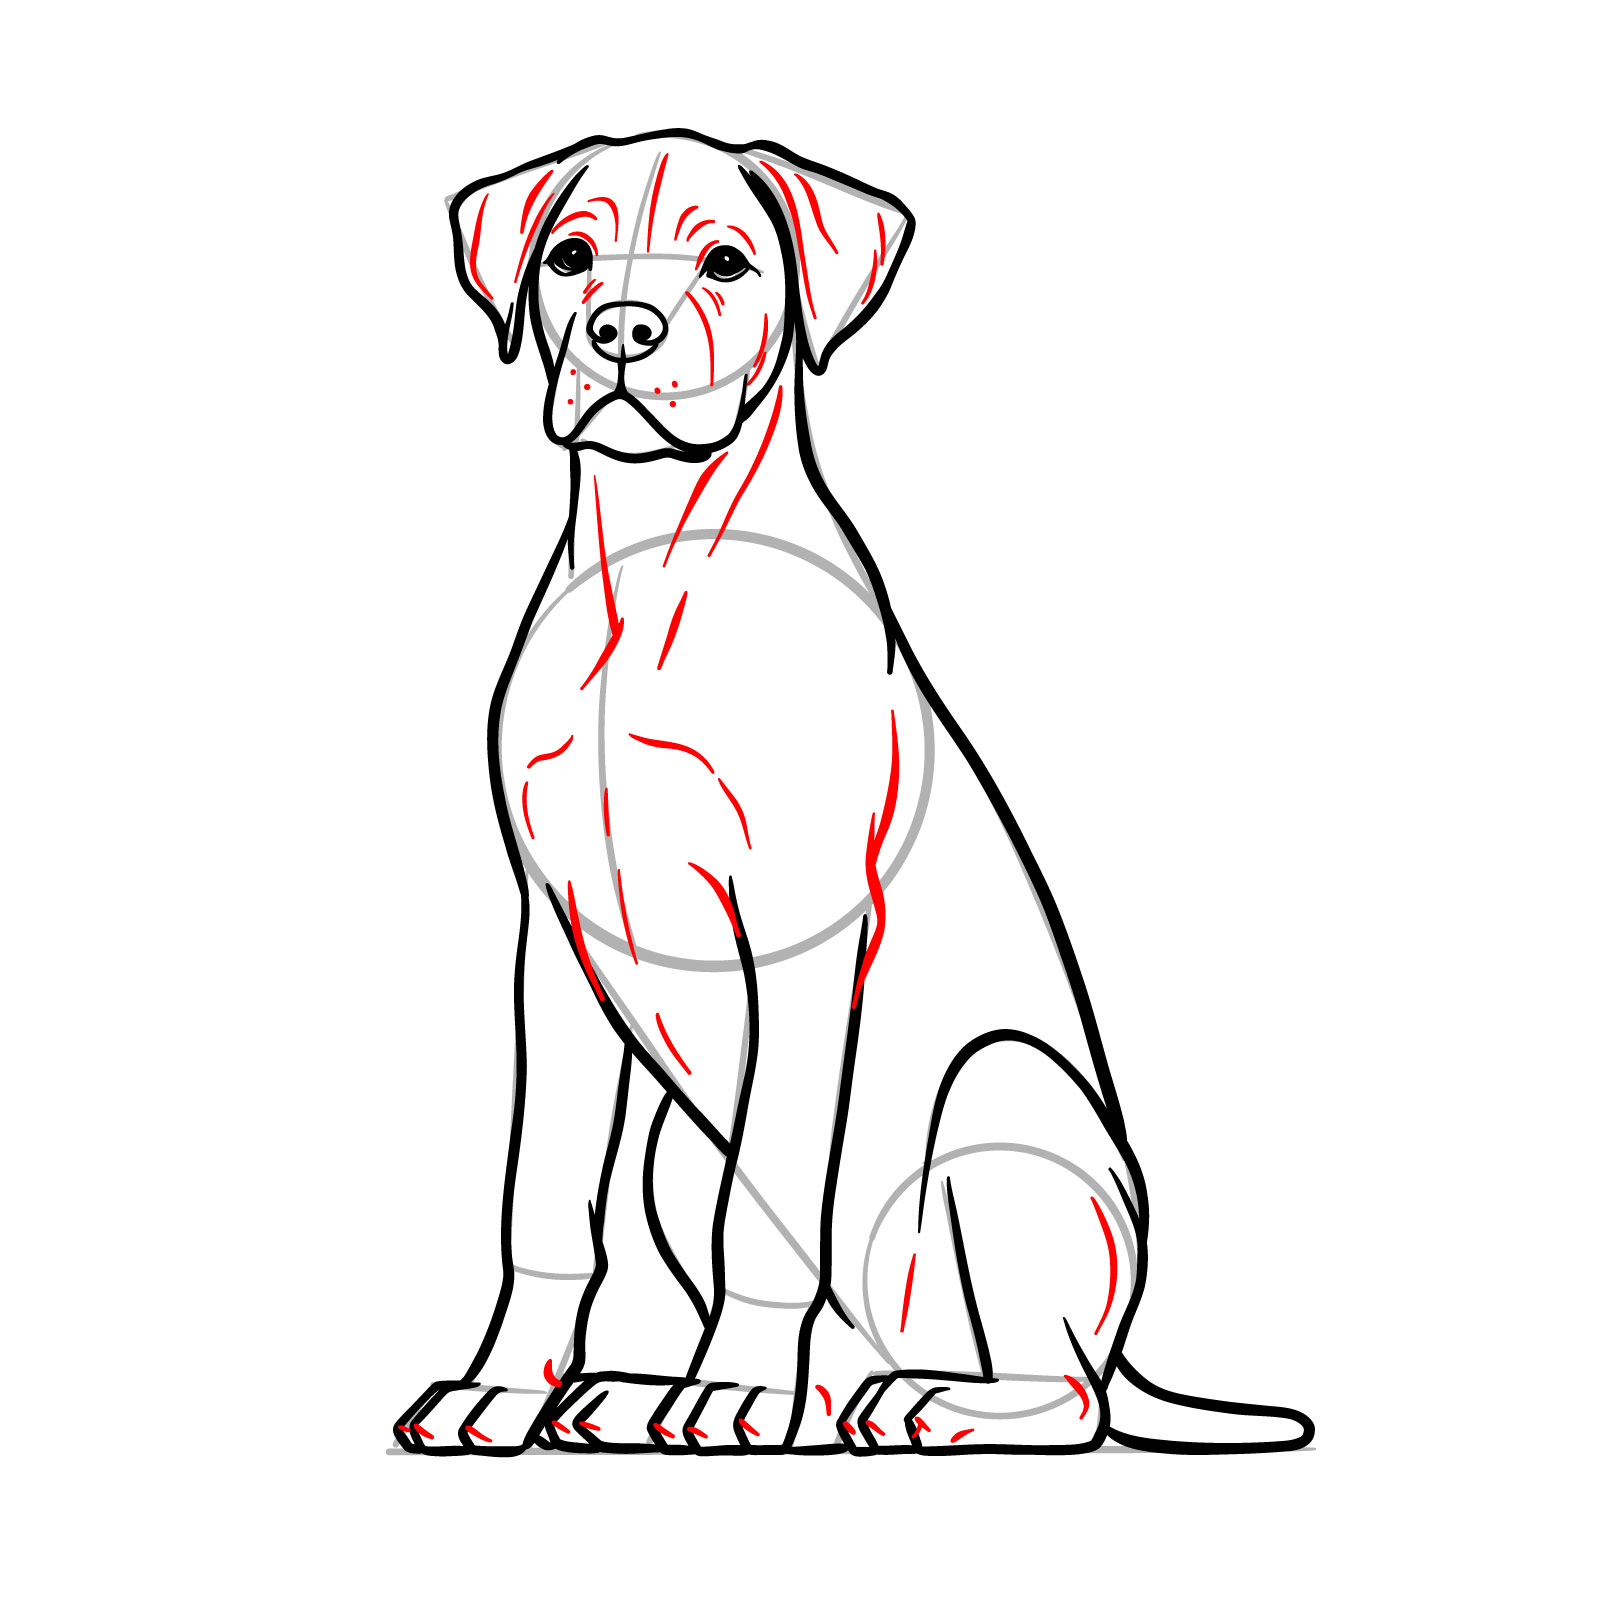
Step 14 : In this step , we ’ ll finalize the drawing of the dog in a sitting pose with a front opinion by add respective details to enhance its realism and definition . Add swerve lines on the ear to show their shape and fold . Make a few simple arch lines on both side of the snout to emphasize the head ’ s structure . Around the center , include small note to fix their shape and point the eyelids . Add dots on the cheeks for whisker score . Under the lower jaw , pull two business to detail the neck . Along the torso and legs , include curved lines to symbolize fur texture and folds . Lastly , at the tips of each hand , make small shapes to point the dog ’ s nails .

Step 15 : In this step , you find the complete drawing of the dog in a sit down pose with a front horizon . At this level , erase the base resume and take away all unnecessary lines created for proportion and guidelines . Review your work , prepare any detail you put on ’ t like , erasing anything excess , or adding any missing elements . Optionally , as ever , you can draft the completed sketch with a pen or ink . Once the ink have dry , erase all remaining pencil lines and the total base sketch to accomplish a sporting , polish last drawing . This step is optional , as mentioned throughout .
10 – How to Draw a Seat Dog : Full Body Side View in 11 Steps

Measure 1 : Start by creating the basic structure of the dog using mere shapes and lines . Draw a band near the top of your draw space to service as the base for the dog ’ s head . Somewhat below and to the right , draw another lot that is slightly larger than the head lot . Then , at a distance further down to the right , make a third lot , like in size to the head band . Use curl business to connect all three circles , as shown in the reference , to form the framework of the dog ’ s body .

Pace 2 : Using simple lines , outline the placement and size of the visible ear from the side view , as good as the shape of the snout . On the upper job score the height of the snout , pull a little vertical line to point where the dog ’ sec center will live placed . From the lower piece of the middle lot , resume simple lines and shapes to spring the front leg and its division . Around the bottom circle , draw curved arch and course to shape the rear leg , show its bend , and a mere tail resting on the story .

Measure 3 : Begin pull the dog ’ s feature , initiate with its snout . Depict a triangular pattern for the nose and fulfill it in with grim , leave a small field uncolored at the top to make a highlight and lend depth . From the bottom of the triangle , draw a line to define the lower part of the snout . From the crest of the triangle , draw a single melody that spring the upper part of the snout , extending upward to form the forehead and continuing to the start of the ear .

Step 4 : In this step , discharge the humble part of the dog ’ s snout with a humble curved line , as shown in the reference . Next , expend a single continuous course to depict the ear , comply the outline from the base sketch in Step 2 . Observe the address image and duplicate the same curve for accuracy . At last , pull a mere heart with elaborate outline around it , leave a small uncolored region for a highlight to lend depth .

Measure 5 : Begin drawing the dog ’ s body . Begin from the humble piece of the snout , where it see the mean circle of the head , pull a smooth tune accompany the base resume to draft the front of the neck and body . Then , begin from the floor of the ear at the top of the brain , draw an lengthy line down along the back of the neck and spine , ending at the ass where the seat and rear leg will begin .

Step 6 : Using the alkali guidelines for the front leg , draw most of the leg , get out the low portion for the next step . Relate to the illustration and employ humble edgy/sharp line and shapes to indicate texture and fur , especially near the crest where the front branch commence .

Step 7 : Discharge the abject portion of the dog ’ s front leg by adding visible division and distinct shapes for each hand pad or toe . Refer to the illustration for proper positioning and proportions .

Step 8 : In this pace , draft the seat branch in the ride pose , focusing on its fold and how it rests on the floor . For the area where the leg bend , use sharper , textured lines to mimic the appearance of fur and add reality to the drawing .

Step 9 : In this pace , fill out the outline of the dog ’ s body by attract the movement and lower portion of the body , including the belly . Use short , curved business to simulate the texture of fur along these areas . Do the same for the seat , following the stem sketch create in Step 2 . With this , the overall outline of the dog is now complete .

Pace 10 : In this step , lend the final details to complete the overall sketch . Draw respective dots on the dog ’ s cheek to indicate whisker target . Add details around the center for depth , and include a line on the low piece of the ear to determine its form and book . Apply a few curved business in the lower and middle parts of the brain to emphasize its contour . Optionally , add veer lines at the top of the presence branch to depict muscle and fold in that area .

Step 11 : In the illustration for this step , you can see the discharge drawing of the dog in a sitting pose , viewed from the slope . As you may find , the guidelines and proportional base sketch from the first two steps exist no longer visible . Carefully erase these auxiliary lines to clean up your drawing . Make any necessary corrections , add neglect item , or take out elements you don ’ t like . Optionally , you can follow the draw with a pen and then erase all pencil business to reach a polished final result .
11 – Sit down Dog : Three-Quarter View in 17 Steps

Step 1 : As in the previous guides for make a sit down dog in total body , commence by sketch three circle to service as the base and proportion for the dog ’ sec torso and chief . At the top , draw the first lot , which will act as the base for the dog ’ s head . Inside this circle , add a vertical and horizontal tune to indicate the direction and middle of the head . Below it , at a sure distance , draw a circle approximately twice the size of the chief circle to make up the upper torso . At last , at the bottom and somewhat to the right , attract another circle the same size as the brain circle to make up the lower torso . Relate these three circles with still , curving business as shown in the mention for this step .

Step 2 : Future , based on the vertical line inside the head lot , draw a horizontal oval at the bottom of the lot to indicate the shape and position of the nose . From the sides of this oval , draw two vertical lines extending upward to meet the horizontal guideline in Step 1 . At the ends of these job , attract two circles to mark the place of the dog ’ s center . Below the head circle , use mere job to create the shape of the lower piece of the dog ’ s snout . From the height of the head circle , extend mere lines outward to outline the frame of the ears . Begin from the seat of the halfway circle , sketch basic figure for the movement legs , and use mere course to outline the visible parts of the rear legs . Optionally , make a horizontal line at the real bottom to represent the ground where the dog ’ s paws rest .

Step 3 : Draw the dog ’ sec nose in full and lend nostrils determine like commas , as express in the reference for this step .

Measure 4 : Draw a tune begin from more or less the lower third of the nose and extend downward to the seat of the mind circle . From thither , produce a gentle “ W ” -shaped line with smooth curves to make the cheek and define this region of the dog ’ sec snout .

Pace 5 : Depict the lower share of the dog ’ sec snout using a single still line , as shown in the reference . Then , outline the slope of the dog ’ sec top dog , hold out the lines up to the basis of the ear .

Measure 6 : Depict the outline of the dog ’ s ears and the top of its mind . You can use a single continuous course or multiple short strokes to mimic texture . The goal for this step equal to finish the outline of the dog ’ s chief and ear .

Step 7 : Inside the circles from the floor sketch that notice the center position , draw two black circles , leaving small sphere uncolored for highlights . These will exist the dog ’ s eyes .

Step 8 : Add details around the eyes to enhance their structure , create depth and defining the form and volumes of the country surround the middle .

Step 9 : Start drawing the dog ’ sec torso by outline the neck with two lines . The first line set out where the ear see the side of the mind on the right , and the second course starts from the left side of the low snout . These line make the dog ’ sec neck . Next , use the base sketch lines to shape the front portion of the torso on the left and outline the back and slope of the torso , extending down to the rear branch on the right .

Pace 10 : In this step , begin drawing the back branch closest to us from this position . Outline the upper portion of the leg , include the turn , reach out down to the part that concern the story .

Pace 11 : Utter the outline of the back leg started in the previous step by drawing the part that rests on the story . Add division for the hand to make distinct shape for each toe .

Measure 12 : Continue drawing the dog ’ s torso and legs . In this step , outline the belly , starting from the left slope of the halfway circle and hold out to the front leg closest to us . Then , draw the outline of this front leg and add distinct figure for the paw pads .

Pace 13 : In this pace , draw the second movement branch in its entirety , accompany the reference illustration to ensure proper proportion and positioning .

Measure 14 : Complete the overall outline of the dog , keep out the tail . In this step , pull the visible part of the second rear branch from this perspective . This includes a little curve at the bend of the out part of the branch , and the section of the paw that rests on the ground , visible behind the front legs .

Pace 15 : In this pace , finish the outline of the dog by drawing the tail . Position it resting on the story , to the right of the dog ’ sec body , as express in the reference .

Step 16 : This is the final step where we add miss details and texture to enhance the overall drawing of the sitting dog in a three-quarter view . Add whisker marks on the cheeks and draw lines to show fold and curves on the ears , forehead , around the eyes , and the snout to set the head ’ s form . Include additional lines on the neck , torso , and above the presence branch , as well as inside the rear leg , to depict muscle shape and natural curves . Use mere lines to make claws and refine details on the lower portion of the dog ’ s hand for a more polished look .
Pace 17 : In this step , erase the basis sketch created in the first two steps , as good as any remaining pencil target , to clean up your completed drawing . Review your study to ensure all detail are in spot and add any missing elements if necessary . Optionally , as remark in former guides , you can draft the resume with a pen or ink for a keen and more polished flavor . Once the ink hold dry , erase any remain pencil lines for a clean and professional last .
12 – Dog Drawing : Full-Body Side View in 12 Easy Measure

Pace 1 : Since this equal a standing pose , we ’ ll as well use circles as the stem , but we ’ ll posture them differently to think over the dog ’ s stance . Start by drawing the chief lot for the chief in the upper lead part of your paper . Slightly below and to the right , make another circle twice the size of the first one to represent the upper body . To the right of that , at a similar distance , draw another lot of the same size as the head circle for the rear part of the dog ’ sec torso . Associate these circles with straight lines , as shown in the address illustration .

Pace 2 : Using the circles from the former measure as a base , commence forming the universal details of the dog ’ s limbs and snout . In the upper correct part of the chief circle , expend two lines to draft the ear ’ sec flesh . Cover a melody from the left side of the head circle , then another one from it downward and then back to the right to shape the dog ’ s snout . Lend a vertical job near the outset of the snout on the right side to mark the eye ’ s status . Use mere rectangular shapes and note to draft the presence and rear legs . At last , lend basic course to indicate the seat .

Step 3 : Draw the outline of the snout , as good as the movement and top part of the chief lead up to the ear . Start by make a triangle-like shape with rounded corner for the nose , filling it in with black . From the bottom of the nose , draw a curving course downward and to the right to create the outline of the humble part of the snout . Then , from the top of the nose , come the base survey to draw a note that define the upper snout , forehead , and the top part of the head .

Pace 4 : Pull the dog ’ sec heart , filling it in with black while result a small area uncolored for a highlight . Add detail around the eye to enhance its depth . Next , outline the lower jaw with a smooth line and draw the ear , comply the base sketch for proper positioning and flesh .

Measure 5 : Draw the front region of the neck and the outset of the torso . Continue by outline the back of the neck , extending the melody along the rear , and connect it smoothly down to the height of the rear leg .

Pace 6 : Lend a somewhat curl note to outline the front piece of the body . Mighty after , outline most of the front branch closest to us , leaving the lower percentage for the future measure .

Step 7 : Complete the abject part of the front branch to finish the first branch in out dog pull . Equal certain to divide the hand into separate segment by drawing each toe separately .

Pace 8 : Pull the outline of the lower torso and belly . In full define the rear leg , completing the structure initiate before when draw the spine .

Measure 9 : At this level , finish pull the legs by adding the two missing legs . Expend the address for this pace to ensure proper proportion and point .

Measure 10 : Trace the ass , shaping it to flow of course behind the dog .

Pace 11 : Add last details to enhance Platonism . Include fold and curves in the torso to represent muscle and natural contours . Add details on the branch , lines around the eyes to specify the head frame , fold on the ear , and small dots on the cheek to make up whisker score .

Step 12 : In this last pace , erase the base resume produce in the first steps to clean up the drawing . Carefully look back the survey , compensate or refining any elements as needed . Optionally , draft the sketch with a pen or ink for keen lines . Once the ink has dried , erase all stay on pencil mark to reveal a clean and polished drawing of a endure dog from a side horizon .
The next guides I design to make will focus on drawing specific dog breeds , each feature different styles , angle , and poses . The first one , a tutorial for French Bulldogs , is almost ready and will offer a form of drawing choice for this popular breed . If you ’ ve enjoyed these guides , sense free to share this one with your friend or on social medium . Have me know in the comments if you ’ d like to see more like this—your feedback helps form future tutorials !
Your support makes these dog drawing guides potential . If you found this tutorial helpful , regard donating to aid me continue produce free subject for artist and dog lovers worldwide .
I ’ 500 dear to see your complete dog drawing ! Share your study in the commentary on this article on Pinterest . Don ’ t forget to trace SketchOk on social media for more tutorials , updates , and inspiration :
- YouTube
- TikTok
Did you like the tutorial ?
You can defend the author of this website and also hint your own estimate for novel drawing by reach a humble donation hither :
